new eZip motor

Status
Not open for further replies.
3kW in the back is better. If it a chain drive u dont need a torgue arm which is good if it is indeed an aluminum frame. On the same note, Bafang (assume hub) motor in suspension (aluminum?) fork is a touchy setup. Lower power Bafang and GOOD torgue arm may make it safe. But 45 mph on that rig you propose will be hairy.

You may want to watch Grin video on dual dissimilar motor control. Also read up on this in Tecklectic's Yuba 2WD build thread here on ES. He used identical hub motors which simplifies matters. I myself have not looked into it deeply yet but understand that there be dragons. Other members may advise on specifics when you settle on what exactly you want.
 
Bafang (assume hub) motor in suspension (aluminum?) fork is a touchy setup. Lower power Bafang and GOOD torgue arm may make it safe. But 45 mph on that rig you propose will be hairy.

Yea I know.

I think it was early spring but could have been last year I snapped the drop outs with a Bafang. My solution was a three step process.

The first was to look for steel which the Diamondback Outlook is as a magnet stuck. I replaced the forks that broke on the Currie but still aluminum. Better than the ones that broke though. The 26" dual suspension is also aluminum but also thicker then the ones I broke. It is a royal pain in the arse. It is why the front direct drives I bought are on the back. NOT the front.

The third step is re learn how to use a thumb throttle. That is done with the wheels suspended so zero load. Then practice how to spin the wheel slowly. It takes a real light touch. that piece of advice is good for anyone who reads this post. It can also save a lot of broken drop outs in the future. It is good practice for any motor on any wheel chain or hub to test at zero load but especially any front hub motor.

That said I ran into a few situations where a torque arm is needed but impossible to mount. Well maybe not impossible but would take something special. Might need a machine shop. :roll: I took a short cut to isolate the axle nuts by vice grips so they stay as tight as possible. You do not want any room for that hub motor to snap the drop out. Any play could risk failure. and in one case I used a ratchet and socket and the steel clamps that come with standard torque arms. :lol:

The local bike shop did not want to touch it and called it sketchy. First time I heard the expression and now I use it all the time. :lol: Those are things I need to address when I start my new , good , professional , clean also tricked out I think Tomajsz said. builds I plan on doing.

I cant take short cuts or do sketchy shit on a GOOD build. I realize that. I probably should have steel forks with every e bike with a front hub. The Giant Roam does not have front steel forks. They are aluminum as well. That is why that throttle trick is important. Probably the best advice I came up with. Sure someone else thought of it first but I do not know who. It was my idea. I did not copy anyone.

I am working on the LTOs. My Wall Mart cutter works good. Connecters work. I have to count everything to see if I have enough. I still need solder. I have none.

Taking my time on the LTOs. I am posting a video now.

https://www.youtube.com/watch?v=SrXIpsxoHBU

The SLAs on the top I need to measure. Was going to put them on top of the 12S packs under it. 60 pounds on the top bar is too much. BUT It I can mount the SLAs on the lower bar and still have enough room on the top bar for the LIFEPO4 it could work . I doubt it but will measure the Currie. I got plenty of wood to build it smaller to fit over the bottom bar.

I have everything I need for the LTOs. I am going slow and testing each connection before and after. I will tape over the cells that I do so I don't drop something on them and short them out. I might cut out card board squares. I have panels cut but need to screw them in when they are finished and ready to charge.

Solder is all I plan on spending this month. I need to save money to move. At least 2,500 put away. Then I can order the prismatic cells. That could happen by next month this time if I don't get stupid. The 20" bike with the 1,800W brushless motor is a great e bike to work on this month and wont cost any money. I went cheap on the 1,500W brushless controller. 48V. I might hook up the 3 kilowatt 70 amp 60V controller and run all 24 - LTOs. Then if it will do 35 mph I wont need a brush motor on the front. :twisted:

Thanks.

LC. out.
 
The third step is re learn how to use a thumb throttle. That is done with the wheels suspended so zero load. Then practice how to spin the wheel slowly. It takes a real light touch. that piece of advice is good for anyone who reads this post. It can also save a lot of broken drop outs in the future. It is good practice for any motor on any wheel chain or hub to test at zero load but especially any front hub motor.

Imagining an egg between one's thumb and the throttle as a form of axle spinout protection is wishful thinking. The time will come when you will be forced to speed up out of trouble and - voila! - you are on your back in the middle of an intersection with you fork ruined. Everyone has a plan until it actually happens.

BTW, chain drive doesn't need a torque arm. But powerful motor installed on a whimpy fork it's still a concern. At 3 kW you can get in trouble by too enthusiastic throttle use, yes. But even with lower motor power, or gentle acceleration, emergency stopping may still strain the fork beyond its design limits. Last but not least, hitting a sizable pothole will indeed test the strength of any fork. Imagine the road you ride safely on an non-motorized bike at 15 mph. On a heavier ebike "gently accelerated" to 30 mph on the same road, you kinetic energy will be exactly four (4) times higher (kinetic energy is proportional to speed squared.) Ligher conventional bike might have bounced itself out of trouble, but have ebike with four times the energy to dissipate may hand its fork too much trouble to handle.

What DOES work for light alloy fork dropouts is puny motors (torque washers fine then) or really well designed custom torgue arm or better yet torque plates. This is so obvious that ES doesn't even have a lot of discussion going on. It may be because everyone takes it as non-negotiable/must do while building ebikes, and those who don't probably don't live to report the results here. I don't know.

I always thought the brakes is the most important system on a bike. I understand that I didn't realize that in the back of my mind (front) axle spinout prevention is as much or even more important. I just put a 1000w front hub motor on my Yuba. To make it work with just torque washers I limited power to the motor to 500W for now. It may handle a bit more but I don't want to experiment. My winter project is making custom torque plate because I am not comfortable with aftermarket torque arm designs. I bought Grin V3 one and it is the best I could find but it doesn't quite fit V4 Yuba dropout. I may be able to modify it but may as well make a custom one piece type.

You need to pay real attention to your front fork(s) design. I mean BEFORE you drop 3-4kW and 40 lbs on a bike and hit the throttle.

It turned out long winded, maybe for the better to help get this message across.
 
You need to pay real attention to your front fork(s) design. I mean BEFORE you drop 3-4kW and 40 lbs on a bike and hit the throttle.

It turned out long winded, maybe for the better to help get this message across.

Yea.

It is why I am in no big rush to finish the Haro V3 and the 3 kilowatt motor. The 3 kilowatt motor is going on the back but you are right about pot holes. If I were to hit a 4 inch or even a 3 inch pot hole at 30 mph it could easily snap the fork.

I got banged up pretty bad at about 15 mph back in NY. I think it was in 2015. Might have been 2014. I was riding in the dark and did not have a good light and was a broken section of road on the shoulder and was riding against traffic and headlights and I flipped the bike and cracked my ribs. Was sore for about a month. It also cracked the 26" 1,000W direct drive rim. I did not realize it then but was a high spot in it and went to get it trued here in Ohio and the guy at the bike shop saw it.

I paid about 100 bucks to get it mounted on a new rim and had to take it apart and rewire it also. It is working and on the back of the 26" dual suspension. The 20" - 800W direct drive is on the back of the 20" Turbo. That is also a front hub motor but wont run it on the front.

I need to look into better torque arms for all my e bikes that have geared hub motors on the front. It would cost hundreds of $$$ to replace forks. Lord knows how much for the Giant Roam.

I just need to make sure I don't hit pot holes at any speed. I try to avoid them. I also try to avoid cars but that is difficult. Got assholes driving cars everywhere. It is why sometimes I just do not want to ride. They are rude and yell stuff out the window and hog the road. I hate them yet I own a van so am not much better. I just don't drive it much.

What you are saying is also why I want a bike like that.

https://www.youtube.com/watch?v=WRHYiwAG1Dg

I wish I could find someone to weld something like that together for < $500. How do you think that would do at 30 mph vs a 3 inch pot hole ??? A 4" , 6" :lol: I know a car wheel would absorb a lot more of the impact than a bike tire and would be a lot less strain on the bikes frame. Probably be cheaper to start out with a 250 cc dirt bike frame with the shocks. If he could build all that he could probably figure out how to add car shocks. Imagine car wheels and car shocks.

I got all the series connections done on the one 10S - LTO pack but need 40 nuts for the other pack as using two nuts for each connection and sandwiching the ring terminals between them so they are not loose. Since the terminals recess and the ring terminal is larger than the bottom extra nuts are required so looks like another trip to the hard ware store before I am finished.

When I get around to the serious builds where I need torque arms that are special I will take pictures and maybe can get some feed back on where I might be able to get it. I will never run a hub motor on the front over 500W anyway as I already know.

Thanks.

LC. out.
 
Why on earth would you want that monstrosity using car rims and tires you would be far better off making your own super78 with horrible welds and 20" fat bike wheels now that would be totally cool if you want torque arms here you go https://ebikeling.com/collections/other-ebike-accessories/products/universal-laser-cut-torque-arm-v2-for-electric-bicycle I heard some dont fit so tight. What projects have been finished in 2022
I just pounded out 2 little jobbies one a 12v 0.50a fan connected to 8.40v with a switch added to blow the solder fumes away or suck fumes away I hope thats what you do when your soldering or do you inhale those fumes and might get headaches once or twice.
[youtube]tcjvHHqds-c[/youtube] [youtube]sCgmWZUIZBk[/youtube]
 
I also try to avoid cars but that is difficult
Yeah...

I just need to make sure I don't hit pot holes at any speed. I try to avoid them
You can't win here. This is not a good bet.

. It would cost hundreds of $$$ to replace forks
This could be a valid concern but in the case being discussed it's you teeth and other quite important stuff at stake, you know. Spending $$$ on a good fork UPFRONT might be a good idea though.
 
When I get around to the serious builds where I need torque arms that are special I will take pictures and maybe can get some feed back on where I might be able to get it
:thumb:
 
What projects have been finished in 2022
I just pounded out 2 little jobbies one a 12v 0.50a fan connected to 8.40v with a switch added to blow the solder fumes away or suck fumes away I hope thats what you do when your soldering or do you inhale those fumes and might get headaches once or twice.

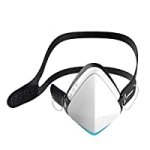
I am glad to see this post is active. I use a small air purifier. I Could probably upgrade but also wear my electric mask. I have spent at least $200 since COVID 19 started. Most of the masks that failed was because the rubber sealer comes off. The first one I had about 6 months before the fan failed.

410t-dNplDL._AA200.jpg

I got extra filters and one filter will last about a dozen times by simply misting it with Lysol aerosol spray and let dry over night. Since the new variant came out I am back to electric mask. I guess I am an electric kind of guy. Electric bikes and mask. It works great and the small filters offer similar protection to a M95 mask.

If shit keeps getting worse I might go back to a plastic surgical face shield over that. Talking about % of protection. I stay at 99% plus with all that. Over 90% with just the mask and had my J&J booster. Hoping I can get a booster every 3 months. I keep hearing about people getting sick and recover. I am trying NOT to get sick at all.
 
calab said:
Why on earth would you want that monstrosity using car rims and tires you would be far better off making your own super78 with horrible welds and 20" fat bike wheels now that would be totally cool if you want torque arms here you go https://ebikeling.com/collections/other-ebike-accessories/products/universal-laser-cut-torque-arm-v2-for-electric-bicycle I heard some dont fit so tight. What projects have been finished in 2022
I just pounded out 2 little jobbies one a 12v 0.50a fan connected to 8.40v with a switch added to blow the solder fumes away or suck fumes away I hope thats what you do when your soldering or do you inhale those fumes and might get headaches once or twice.
[youtube]tcjvHHqds-c[/youtube] [youtube]sCgmWZUIZBk[/youtube]

This cited torque arm is certainly better than a torque washer. It looks like it's Grin design (V1 IIRC) or even manufacture, so read up on it's shortcomings on Grin site (ebikes.ca) Also check our better options while there.
 
Stock up on n95 when going out the n95 masks were cheap when things calmed down but things have piped up a bit with the new variant have you gotten your 3rd or 4th booster shot yet?

latecurtis said:
What projects have been finished in 2022
I just pounded out 2 little jobbies one a 12v 0.50a fan connected to 8.40v with a switch added to blow the solder fumes away or suck fumes away I hope thats what you do when your soldering or do you inhale those fumes and might get headaches once or twice.

I am glad to see this post is active. I use a small air purifier. I Could probably upgrade but also wear my electric mask. I have spent at least $200 since COVID 19 started. Most of the masks that failed was because the rubber sealer comes off. The first one I had about 6 months before the fan failed.

410t-dNplDL._AA200.jpg
 
They are sold from multiple sources with varying opinions on their successes and fitment, which I believe might be from people not knowing what their axle flat width is they think its all the same but I have had different motors with different axle flat widths. The washer with the lip that jams in the dropout slot is not good use a minimum of one real torque arm for 500w and under and two real torque arms for 500w or more when using electric braking the axle nuts come loose with the torque arms due to the throttle moving the axle one way and the braking moving the axle the other way.

kuz said:
This cited torque arm is certainly better than a torque washer. It looks like it's Grin design (V1 IIRC) or even manufacture, so read up on it's shortcomings on Grin site (ebikes.ca) Also check our better options while there.
 
The washer with the lip that jams in the dropout slot is not good use a minimum of one real torque arm for 500w and under and two real torque arms for 500w or more when using electric braking the axle nuts come loose with the torque arms due to the throttle moving the axle one way and the braking moving the axle the other way.

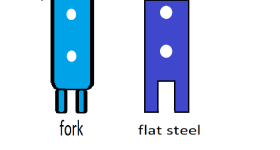
I was thinking about flat steel bar and a grinder. I can grind a slot the same size as the drop out and bolt it right to the fork. That will work on some forks but not all though as the flat bar must be flush with the drop out and that is not always possible.

Untitled.png

replacing the forks with thick heavy duty steel forks is usually the better option. Also for a clean look. Are there any after market forks designed especially for hub motors ???

Since the e bikeling 500W geared hub motor is the most powerful motor I will run on the front of any e bike I was hoping not to spend a fortune on replacing forks though.

I deleted my last post as was not e bike related. I left it up for awhile. I still did not get to the hard ware store for the nuts and solder needed to finish the LTO boxes. I need paint and primer as well as wood putty. They need to look as good as possible.

The big problem with the Bafang motors is the axles are really short. It will only allow one torque arm in most cases. It is why I tightened the axle nuts as tight as possible without stripping them and then used vice grips and steel clamps to keep the nut from loosening. It don't look good though. I cant do that on a professional build.

I also want to re build that SLA box so it will fit over the bottom bar if possible as will give me an extra 10 miles of range for 20 miles total with the 12S - LIFE in parallel. It will be too top heavy with the SLAs on top of the 12S - LIFE. The bottom bar is my only option. I do not want close to 40 pounds on a rear rack or a front basket.

I still plan on the prismatic cells but not until I have enough money saved for a move as moving must happen. I live in a shit hole.

Thanks.

LC. out.
 
“ Yea I know. ”

No not yet…
 
nicobie said:
It's true, torque arms don't seem to get the attention here that they used to. It's not a bad idea to use 2 on each axle either.
Always on my builds. Old bones suck at recovering.
 
surly-mds-dropout-chips-229802-1-15-5.jpg

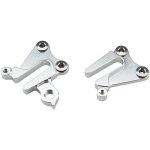
Not sure how good they are.

Tomajasz.

What brand torque arms do you use ?

When I start doing clean professional builds I will order heavy duty steel forks as well as whatever it takes to make it safe. I can not afford any more bike accidents. I hit a drainage hole which was covered by long grass. I was not going fast at all but still flipped the bike and severely injured my right shoulder back in July 2019.

The Ortho doctor wanted to do surgery on my rotator cuff but it healed naturally. Any further damage though would not be good at all. Therefore even though I might want to go really fast I might not. But if I do I want a safe road ahead and a safe bike under me.

Thanks for posting.

LC. out.
 
Were you drinking and smoking weed when you hit that pothole and hurt yourself you can install torque arms any style any way you like make your own or buy them it really does not matter. The picture of a wrench used as a torque arm is no longer on the server https://endless-sphere.com/forums/viewtopic.php?t=11570#p176159 but this is a good one https://endless-sphere.com/forums/viewtopic.php?f=2&t=26444#p381875
Here is another picture of a wrench used as a torque arm https://endless-sphere.com/forums/viewtopic.php?f=2&t=26444&start=25#p420770
 
Not sure how good they are.

These are pretty good for what they are intended to do but they are not torque arms.

A very good write up on universal torque arms is here:

https://ebikes.ca/product-info/grin-products/torque-arms.html

You will see there that Grin designed V1 arm is no longer manufactured by them so similar looking units are all knock offs made of too thin 3 mm stock and are better than nothing but Grin doesn't recommend even their original ones. Heeding Grin's recommendations is not a bad idea indeed.

Grin's V3 is similar to V1 but have two hose clamps instead of one. Two hose clamps are better than one naturally but they are still hose clamps. The arm they are attached to is positioned to afford the most resistance to axle's torque. The unit is 4 mm thick. I won't use it anyway.

I bought V2 hoping it'd work with my Yuba but the mounting screw it came with is too skinny. The part that sits on the axle is beefy 4 mm thick part that looks trustworthy. If you make it mate with your mudguard mounts itxd he as good as it gets for two-part arm.

A custom torque plate - done right- is best. But don't make it open ended like you show on your sketch. Make a closed hole to sit TIGHT on the axle and use fender mount line V2 does except you can make it in one piece. That way it'll look more clean, way a ton less than you solution, and withstand stronger forces. It needs to be 4 mm minimum, 5 if you can fit that much.

With geared front hub motor you don't need to worry about the axle pushing in both directions (regen would've created the opposite torque vector) so one such plate would be sufficient if you truly have <500W motor. Torgue washer on the other side if you don't have room for a full plate there. That'll work for a regular steel fork. For an alloy fork you will need torque arms or plates on both sides, but i'd stay away from random alloy forks altogether for ebike service unless you use small 250W motor like G311.

There used to be a good torque arm offered by Amped Bikes but I can't find it anywhere anymore.

Teague Grin article and search ES for "torque plate" and "torque arm".

Other more seasoned members will offer more thoughts/ideas if you ask. No need to invent the wheel so to speak. Or experiment with your life.
 
Were you drinking and smoking weed when you hit that pothole and hurt yourself you can install torque arms any style any way you like make your own or buy them it really does not matter. The picture of a wrench used as a torque arm is no longer on the server viewtopic.php?t=11570#p176159 but this is a good one viewtopic.php?f=2&t=26444#p381875
Here is another picture of a wrench used as a torque arm viewtopic.php?f=2&t=26444&start=25#p420770

NO.

I was on my back from Home Depot. Sober as a judge. I remember the day.

In 2019 it was Wall Mart and also sober. I dont drink during the day.

if you truly have <500W motor. Torgue washer on the other side if you don't have room for a full plate there. That'll work for a regular steel fork. For an alloy fork you will need torque arms or plates on both sides, but i'd stay away from random alloy forks altogether for ebike service unless you use small 250W motor like G311.

My geared hub motors are 500W or less. e ikeling and Bafangs.

Thanks for posting.

5 AM.

A custom torque plate - done right- is best. But don't make it open ended like you show on your sketch. Make a closed hole to sit TIGHT on the axle and use fender mount line V2 does except you can make it in one piece. That way it'll look more clean, way a ton less than you solution, and withstand stronger forces. It needs to be 4 mm minimum, 5 if you can fit that much.

Thank you. I will keep this. I hope nobody deletes this post as I need the information. Right now I am drinking so I need to read it sober. I don't ride much but when I do am sober. I do not drink during the day. I drink when I am home. Then I sleep.

Thanks for posting.

You guys are awesome. :D

LC. Out.
 
Are you a big columbus blue jackets nhl fan?

I don't watch it. I don't watch any sports any more. I used to watch a little football but since Brady left the Patriots I dont have a team now. I don't have cable either so don't get any live games. Also I am not from Ohio I am from NY. I moved here in the spring of 2019.

Working on my LTOs. I got one 10S pack done. I ran into complications. One of the reasons is the cells being manufactured in China probably. I bought nuts from more than one hard ware store. Some of the nuts were wrong. I had to really torque down on them with a ratchet. I took one of the nuts with me and got 5/16 " nuts today which were worse. I should have took one of the four LTOs I am not using right now. The metric size don't seem to fit either.

Since the tops of the cells are recessed I needed a nut on the bottom to sandwich the ring terminals between. I managed to get the job done with nuts that really don't fit. I also forgot the solder when I went to Home depot. The solder I was going to get was at True value which closed as I had to do other things. I had to spend 10 bucks at Wall-Mart to buy a 30 watt iron as it came with a little tube of solder. They were sold out of the solder they sell separate.

I ran out quick and need solder for the other 10S LTO pack. It is really starting to piss me off. The only good thing is I spent about $30 on a carry bag for batteries which was too small for the LIFEPO4s I built so basically had no use for it and was thinking I wasted my money but even though it is a little too big it will work for the 10S - LTO pack I just built so wont need to paint. I think it is water resistant also.

I will post pictures when the other 10S pack is finished. I will be hooking up the new power meter and the LTOs to the 20" bike with the 1,800W brushless motor.

Thanks.

LC. out.
 
Grin torque arms or custom. Custom are expensive. eBikes.ca isn’t cheap but nice torque arms. No stamped Chinesium.
 
Wrong nuts will strip or break the threads on the LTO!
Expensive mistake! Not the price of the nuts, the irreparable damage to the expensive LTO!

Lack of patience in finding the proper nuts demonstrates ...
 
Sometimes this thread seems like an incredibly elaborate, long-running troll.
 
kuz said:
These are pretty good for what they are intended to do but they are not torque arms.
Though they are thick enough they could possibly be turned into clamping dropouts, *as long as the actual dropout is an exact fit for the motor axle!)

See The Torque Arm Picture Thread for some examples, or a search on the forum for the term.

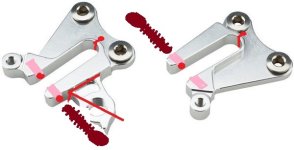
Basic instructions, assumign those specific parts. Picture at end, all cuts and hole ends are red. Pink is "see thru" to see the length of the holes, and maroon is the bolts.

You'll probably have to remove the dropout hanger.

Drill a hole sized for an allen-bolt, etc, (like M6x1) all the way straight (*must be straight, and perpendicular to the dropout slot*!) thru the bottom and into the top of of the dropout, so the hole ends about where the threaded fender-mount tab joins.

Then drill out the "bottom" hole just a size larger, so that the threads of the bolt will clear it completely but it won't rattle around in there.

Then tap the "top" hole with threads that match your bolt.

Use a bolt long enough to just fit thru and fully thread in, and use a flat washer and lockwasher (even just a splitwasher or star washer).

Add a short slit at the end of the dropout so the faces can stay more parallel than otherwise, and so that there is less stress on the rest of them; ensure you add a "crack stop" hole at the end of the slit.

It might be necessary to make the hole in the "skinnier side" of the dropout plate for the button bolt that secures these to the frame just slightly oversize, so the bolt can "float" in it a tiny tiny bit, to allow the clamping to work normally.
 

Attachments

  • surly-mds-dropout-chips-229802-1-15-5.jpg
    surly-mds-dropout-chips-229802-1-15-5.jpg
    39.1 KB · Views: 163
Status
Not open for further replies.
Back
Top