As the Hub Motor Turns and the LiPo Fire Burns. 40 mph. - Maybe - 35 mph - most likely.
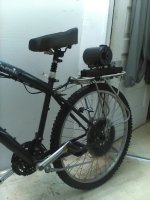
I just got back from the post office. The old 20" former dual chain drive e bike got a brush-less motor upgrade. The 1,800W brush-less motor to be exact.
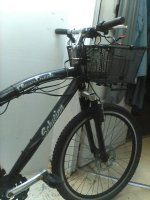
The 26" Schwinn I built for John that I used zip ties to make the wheel spin as it is a right thread freewheel on the left side is ready to be test driven. The chain appears to be a little loose but need to drive it to know for sure. That part is my least favorite part of building e bikes. It requires a hammer or mallet, vice grips and the right size open end wrenches. It is the main reason why hub motors are better than chain drives. I am not worried about the zip ties snapping as I plan on upgrading to four steel hose / muffler clamps.
Lining up the motor and wheel sprocket and getting the chain Not too loose or too tight requires a certain amount of mechanical skills. I am not doing it today. My weight bench is in the hall way and do not feel like moving it. I need to do at least 4 sets of preacher curls sometime tonight, I think John may have given up on the Schwinn as it has dragged on for about 4 months now. The first attempt with #40 sprocket and chain failed miserably and I had to wait about 2 weeks for the #25 chain breaker.

It is why I probably will never be building e bikes for people. I may sell bikes already built that are test proven but I am not ready for custom builds and deadlines.
I plan on doing my favorite parts of e bike building tonight. Building a triangle rack and hooking up the electronics and doing a test video of the wheel spinning. :lol:


I was happy with the 8mm chain even though I do not have a sprocket for it as I decided to hook up the #40 - 56 tooth spoke sprocket for now. I do like the thickness and actually looks stronger than standard bicycle chain. Without a doubt any future chain drive builds or upgrades will be with 8mm chain and sprockets.
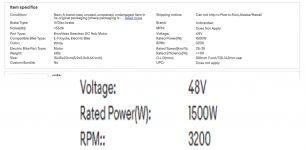
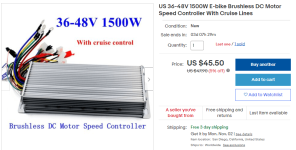
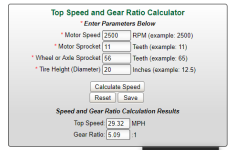
I was thinking while walking back from the post office that with a 1,500W controller I might be limited to 35 mph. However I notice that the amp rating is 38. I believe DA said something about 40 amps for peak performance. 38 amps is very close to 40. 38 amps * 48V = 1,824 watts.
Like I said it may not reach 40 mph on flat ground but should get about 35 mph with the old LiPos Dan sent as long as they charge up to around 48V. 4.0V * 12 = 48. I doubt they can hold much over 4.0V per cell due to their age.
With voltage sag it should be around 46 or 47V. I will go with 46 as they are not even close to being new.
1,800W / 48 * 46 = 1,725 watts.
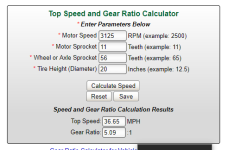
I was going to order a 60V - 3 kilowatt controller and four - 4S hard shell LiPo packs later on this winter for 40+ mph but may not run the 20" bike at 60V. I might order a hub motor to do that. I am not sure.
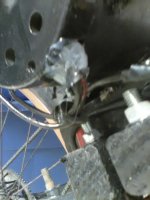
The 26" hub motor will be getting fixed as the bike shop said 50 bucks at the most to thread it to a new rim and if I stay with a 26" rim the spokes will fit that Dan sent. I also found a front dual wall 26" rim to use. I have three 700c rims that are dual wall but already have the spokes for the 26" rim.
I want to build a dual hub motor bike so will be ordering a second 26" hub motor and am looking for the same specs. but for a rear hub motor kit.
I doubt I can achieve 40 mph though with 60V. I believe gearing at 48V to be 28 mph with that 26" hub motor. Not sure what motor I will use for 40+ mph.
The dual 26" hub motors are for the 26" dual suspension I rode exclusively for over a year when I moved to Ohio. It will be for steep hills and long distance trips.
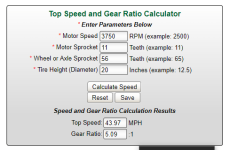
For 40 mph I have Easy street - the 700c hybrid , the 27.5" silver Diamondback and the Haro V3 to put a motor / motors on. A 48V - 1,500W rear hub motor should do 40 mph @ 60V. So will Hubzilla , The Cro - motor if we ever get the second stimilus relief checks.

:lol:
Thanks.
LC. out.
PS.
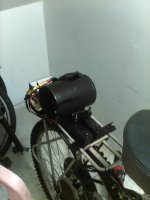
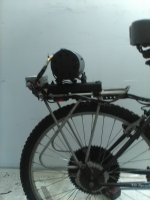
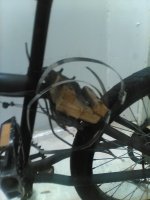
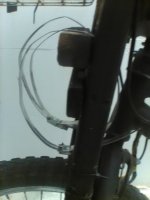
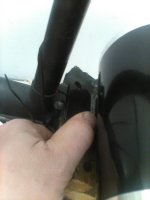
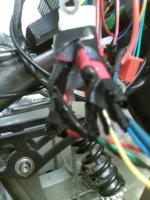
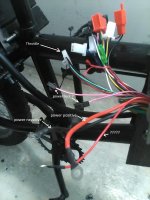
When mounting the brush less motor last night there was a screw up. The hall sensor wires got caught in the axle I think. It was a clean cut. All 5 wires but there was just enough wire coming from the plug to use my smallest crimp on connectors. I spoke with Mike briefly on the phone and he told me that I should break out the soldering iron. I already knew that but like I told him I really hate the smell of solder and there is not much light at all by the window. I would have to find a light source and hook a fan up and hope my soldering skills are good enough to accomplish it. Or I can break out the electrical tape to reinforce those connections. :lol:


cutting electrical tape as skinny as possible is tedious. I am looking at the plug side of the connector. As long as there is a small piece covering any tiny strands of wire sticking out I may be able to use silicone. It would also waterproof the connector. I will have to wait until tomorrow for it to dry. I still need to paint the motor brackets and build the triangle rack anyway. I can also silicone the hole where the motor wires go inside the other motor on the Schwinn. Hot glue would work even better if I can find it.
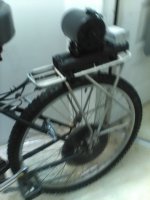
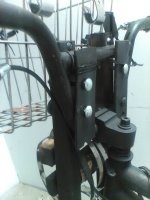
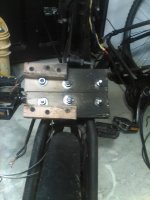
Yea. Fat chance of that. It sucks because I know I saw it a few weeks or months ago. Anyway the silicone will work. I wrapped a piece of electrical tape around it. It should do the trick but wont be able to hook the controller up for about 24 hours. I secured the controller to the battery rack on the dual suspension with a small zip tie and is plugged in and out of the way so I can start working on the battery rack and controller bracket on the triangle frame.
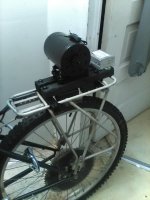
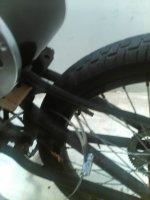
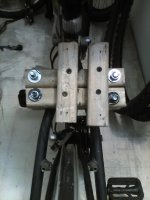
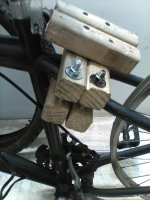
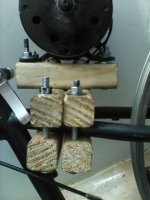
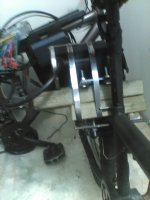
The 3/16" steel brackets were used on the bottom so that there is room for a V brake which worked and will work again once the rusted out line is replaced at a bike shop. Yes this bike will have both brakes that work. I used two pieces of two by four. The bottom is attached by four carriage bolts counter sunk in the wood to the steel brackets on the bottom. Two 5/16" and two 1/4" all very tight. The top piece of 2 by 4 is screwed to the bottom with four long dry wall screws and the steel motor brackets bolted to the motor are screwed in to the top piece of 2 by 4 with 5 drywall screws. Note the two long steel muffler clamps. They were used when the bike was a dual motor set up. That is what will reinforce the 5 drywall screws as well as the four drywall screws attaching the two pieces of 2 by 4 together. That is what makes this motor mount super sturdy.
I am taking a break and will break out the paint and brushes after that.
E bike workshop 101.
Thanks.
LC. out.