backyard millyard....midmount....

Hey members..
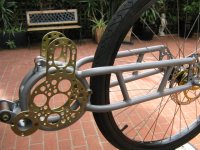
This post is for members who don't know about getting precision fits on pulleys and shafts.
I earn my living as a machinist....and as such i do not consider drilled holes as precision for mounting drive gears/pulleys...

I drilled the 18t pulley to 14mm id, then useing a boreing bar machined hole to 15mm...measuring with telescopic guages and mics....as per normal turning proceedure......so the id is correct......

The shaft is turned down....measuring with verniers first....finnish measuring with micrometer.....so the od of shaft is correct..

Now....pulley id @15mm.......shaft od @ 15mm.......a light rub with emery paper....and we have,for our general purposes ..a nice true sliding fit......

A reamer is a precision tool....a drill is normally not.....unless you have a drill kit that progresses by .1mm increments.....

a couple of thou clearance is sometimes a couple of thou slop........I could not hand this over to the customer......

But the chinese can and do.....yeh it was cheap......nasty and cheap.......whats a couple of thou????

The run-out on my 80t ally pulley is a prime example of the above......

I accept the lower quality for the cheap price......knowing that i might have to "tweak"...code-word for re-work....an item or two...
my chinese lathe and milling machine are no different.....i had to "tweak" them...to be user-friendly...over time...

So members.....a very merry festivest to all.......
 
Hello members...

with festivist over...i can get back to the bike.....so i needed to hold the 18t pulley for the drilling.....a suitable holding jig was set-up...IMG_0197 (640x480).jpg.....

2 off 5mm holes were drilled....View attachment 1......threads were tapped while still in jig....

End result being a neat mod.....IMG_0200 (640x480).jpg.....

I hope the photos show enough info so that someone else can copy.....
 
I needed to look at the 80t pulley....which is 2 parts...screwed together...which item is the cause of the run-out????...

so i set up jack-shaft in a three jaw chuck...check with dial indcator...i'm wth-in 1 thou.....IMG_0209 (640x480).jpg

now slip on steel keyed piece, lock in place with nut.....spin lathe and check for any run-out....axial and radialIMG_0202 (640x480).jpg....

Mine looked so good to my eye that i didn't bother with the indicator....no run-out with this item....

So that leaves the aluminium pulley where the grief may lay.....IMG_0203 (640x480).jpg .....

the front face of the threaded bore is a cast finnish....so our accurate steel bose screws up to a cast surface.....that's a no-no to start with.....both surfaces must be machined.....IMG_0204 (640x480).jpg......

my 80t pulley has .15mm radial side-ways wobble... .25mm axial up and down.........Damm 2 issues to sort out.....
 
to set up for machining......i filed the back face of pulley and check for flatness on the granite kitchen bench....my wife understands.IMG_0210 (640x480).jpg......

no wobble on the granite surface means no wobble in the chuck.......i set up the pulley the best that i could with-out a dial.....the only machined surface is the theaded bore...not the best surface to run a dial on....the rest of the pulley is cast surfaces....not the best surface to run a dial on as well.....

so....happy with set-up i machined the 2 front faces.....the central threaded face and the outer belt face[ just in case i need to set-up again ]......IMG_0206 (640x480).jpg.......

Screwed steel bose into place....radial run-out is gone.....axial run-out still present............

to fix the axial run-out ....i need to machine the thread away and install a bush....bore and screw-cut a new thead ......

so tomorrow i'll sort this bush out...i found some material in the scrap box...
 
.....Hello members....

Bit of an up date....sorted out the run-out with the 80t pulley.....

I machined up a bush....bored pulley.....and loctited it in place.......IMG_0211 (640x480).jpg.....

While loctited in place i did final boreing and screw cut thread......

Next was a trial fit onto jack-shaft and spun in lathe......yyyeeehhh everything looks sweet......IMG_0212 (640x480).jpg.....

now i can't rely on the loctite to hold the threaded bush....so i added 4 off 5mm cs cap screws...IMG_0213 (640x480).jpg.....

did a final spin on jack-shaft in lathe.....perfect......thats that issue sorted......

i just need my drive belts......they're somewhere in the christmas mail......
 
Hello Parabellum....

the battery is 16 off 12amp/hr headways.48volts..total weight is 8.3kg including case......IMG_0226 (640x480).jpg

the centre of gravity seems to be directly below the seatpost....i will have the bike back in the hanging jig in the next couple of days so i'll double check this assumption.

i hope this helps....
 
tri-lobe said:
i hope this helps....
Thank you for the info. I am working on similar weight distributed frame (main difference hub motor on extended extra long swing arm), and am not sure about moving battery lower in between crank and front wheel.
Nice build! Please, let us know the difference in handling/ maneuvering between short and long swing arm, after it is finished.
 
Hey Parabellum......

My wheel base came in at 1025mm........3'or 75mm longer than the hub set-up,which was 950mm or there abouts..

i'm under the impression that a longer wheel base gives a better ride...
 
crossbreak said:
seem like the cup for the neatest GNG mod travels further... from denise to you :) What a cute built! I'm waiting keen to see your rear 3-speed setup.
Hello crossbreak....

Sorry for not replying earlier....thank-you for the comment....Denisesewa deserves her cup because she is riding and enjoying her build.....i'm not...i'm still building.

ok...this is the 3 speed arrangement that i'm running with....sturmey archer...3 speed...cassette...disc brake.....

My set-up is 48v.....i think that the sturmey archer can handle this.....

i might be able to arrange a high and low gear set-up on the cassette.....????????IMG_0230 (640x480).jpg
 
Hello members....

Have sorted out the drive trains.....can crank things over at handspeed....alignments look good...tracking of belt is good....

Dispensed with the tensioner on the belt-drive.....same as Lightningrods....his opinion seconded my thoughts...

i extended my jackshaft mount by 20mm....elliminated the tensioner/belt destroyer....brakes the back of the drive belt.....sucks up watts....IMG_0227 (640x480).jpg

i made up a chain guide/follower for the jackshaft chain drive side of things.....

i had to do a bit of re-work with the chain drive end of the jackshaft......my freewheel sprocket was about 5mm too wide...IMG_0228 (640x480).jpg.

so i had to repositition 2 shoulders and the keyway.....i welded up the offending area's and remachined to suit.......


A pic of the r/h...chain side of things....IMG_0229 (640x480).jpg
 
tri-lobe said:
crossbreak said:
seem like the cup for the neatest GNG mod travels further... from denise to you :) What a cute built! I'm waiting keen to see your rear 3-speed setup.
Hello crossbreak....

Sorry for not replying earlier....thank-you for the comment....Denisesewa deserves her cup because she is riding and enjoying her build.....i'm not...i'm still building.

ok...this is the 3 speed arrangement that i'm running with....sturmey archer...3 speed...cassette...disc brake.....

My set-up is 48v.....i think that the sturmey archer can handle this.....

i might be able to arrange a high and low gear set-up on the cassette.....????????


Looking forward to your findings on the sturmey...

Great build btw!!!
 
hello members....

bit of an update for where i'm at......i haven't given up , just busy with non bike stuff....

i got the 26" rear wheel with 3 speed hub laced up.....motor plates plated a gold colour...cold gal plated.....

when i went to the platers to pick-up motor plates....i got a quote for plateing the frame and swing-arm...$140.00 in total.....in silver....cold gal....

so i ummed and arred.....paint or plate.....paint or plate.....i decided to plate.....more work...finnishing off to a higher level....can't hide blemishes with atuo bog like one can do with painting.....

i have spent a large number of man hours building the trelliss frame and swing-arm....and i wanted to finnish it off in a manner that showed off the frame with nothing covered or hiddened by bog or paint.

so tomorrow and sunday i shall finnish the last of the blemishes...mostly on the y shaped frame which was my first build....which i cut my teeth on.....compeared to the swing-arm, which was near faultless...so i do and i learn...IMG_0232 (640x480) (640x480).jpg

because i've done alot of blending..radius/filleting....ginding.....these are my essential tools....dremel and bits....
 

Attachments

  • IMG_0233 (640x480).jpg
    IMG_0233 (640x480).jpg
    93.7 KB · Views: 1,909
wannesd said:
Looking forward to your findings on the sturmey...

They dont handle much i broke mine pretty quick Matt P also blew his, definatly not
a good idea IMHO... Matt P was using a 1000watt cyclone, my setup was a lil
larger either way, the gears make horrible crunching sounds then spit the dummy LoL

Bikes looking good, the plating will make it pop

KiM
 
AussieJester said:
wannesd said:
Looking forward to your findings on the sturmey...

They dont handle much i broke mine pretty quick Matt P also blew his, definatly not
a good idea IMHO... Matt P was using a 1000watt cyclone, my setup was a lil
larger either way, the gears make horrible crunching sounds then spit the dummy LoL

Bikes looking good, the plating will make it pop

KiM
hello Kim......

i'm only running low power....48v 12amp/hr.....my thoughts for my application was easy city riding...with the ability to comfortablity jump gutters and stairs....no trials/bush/mud stuff....all my riding is around town at low speeds/low power.....i can't zoom around town at 40kms without falling fowl of the boys in blue....

my bike is awork in progress...and if items/parts don't cut the mustard ...then they will be replaced...

Kim what sort of power was yourself and matt P putting through the final drive??????.....
 
AussieJester said:
wannesd said:
Looking forward to your findings on the sturmey...

They dont handle much i broke mine pretty quick Matt P also blew his, definatly not
a good idea IMHO... Matt P was using a 1000watt cyclone, my setup was a lil
larger either way, the gears make horrible crunching sounds then spit the dummy LoL

Bikes looking good, the plating will make it pop

KiM
Hey Kim....

you answered my questions in your post...stupid me.....

so matt P was running twice my watts and you were running more than matt P?????........

I was working on the assumption that a drugged up tour-de-fuff lycra clad athelete could do about 600watts through the drive train.....

i might be in with a chance....i'm very conservative in my requirerments compared to the 3 above examples.....
 
Why does everybody find it so difficult to understand the importance of torque values when discussing either motors or component specifications?

http://www.endless-sphere.com/forums/viewtopic.php?p=690677#p690677
 
Tri-lobe,

Great decision on the paint-plate dilemma. The gold is gonna make it pop like AJ said. Hopefully some day I do a build worthy of some plating. :mrgreen:

John
 
John in CR said:
Tri-lobe,

Great decision on the paint-plate dilemma. The gold is gonna make it pop like AJ said. Hopefully some day I do a build worthy of some plating. :mrgreen:

John
hello John...

the frame is getting plated in silver cold gal.....the motor plates are the only items in the gold colour....

i felt that an all gold colored frame would be too much......there's alot of black on the bike...so my choices are gold and black or silver and black.....

so silver and black with a bit of gold was what i had in mind.....
 
tri-lobe said:
so silver and black with a bit of gold was what i had in mind.....

Sounds perfect, and yeah all gold would have been too much. I've got some AL throttles in route. If the gold one matches your gold I'll let you know. You may need another gold accent up front somewhere to balance it out. I've been wondering how I could possibly use the gold one, and something else gold on the bike is exactly what's needed.
 
John in CR said:
tri-lobe said:
so silver and black with a bit of gold was what i had in mind.....

Sounds perfect, and yeah all gold would have been too much. I've got some AL throttles in route. If the gold one matches your gold I'll let you know. You may need another gold accent up front somewhere to balance it out. I've been wondering how I could possibly use the gold one, and something else gold on the bike is exactly what's needed.
hello John....

the bike has 2 gold discs for the brakes....now 2 gold plates for the motor.....

i agree that a gold throttle on the handle bars would blend in well.....this kind of finnishing off hadn't even occured to me.

John i would very much like to see a pic when your order turns up.
 
I just realized this is YOUR build! Looking good! Can't wait to see it in action!
 
Back
Top