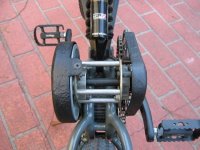
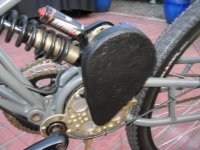
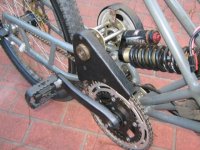
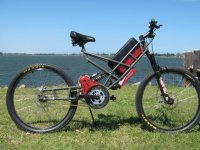
backyard millyard....midmount....

Hi Tri-lobe,

Here's a pic of the AL throttles. The color in the pic is quite true to life, so it seems like it would clash with the gold on your bike, because the throttles are very copper in tone. Let me know if you think otherwise.
 
hello John....

thanks for the pic......thats a very nice set.....are they off the shelf,or a custom type item???

now an update......

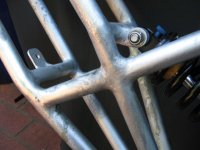
the electro-zinc plateing..." did not""... look good once done....alot of variablity in the finnish....patches of discolouration....

its a good surface for painting onced etched primed though.....it won't rust between now and when i do paint any way...IMG_0249 (640x480).jpgView attachment 3

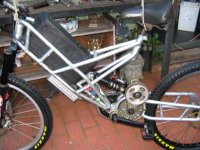
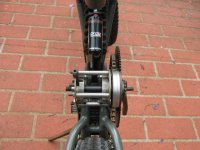
so i now need to get it running.......i assembled the bits and pieces onto the frame....except the rear chain.....then connected battery and spun-up the motor.....

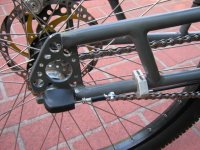
belt tracks well.....primary drive chain running true.....so all these moving parts are working well......in a no load test.....IMG_0250 (640x480).jpgView attachment 1
 
Hey tri-lobe, sorry the plating didn't work better. I hope you didn't have to pay for that. Regarding the throttle, yeah that's how they came and under $10 retail. PM me your address and I'll put a set in the mail. When my supplier told me about them I couldn't believe they didn't do one in just natural AL too. Sometimes the Chinese miss the mark like that.

Note that the wire from the throttle is very short, so you'd have to extend the leads for almost any installation. They do look and feel nicer than I expected....just no AL color.

John
 
hello John in CR....

thanks for the throttle set info.....is that $20.00 for the set....ie $10.00 per item????.......

i can get a joinning link at my lbs for $10.00....

YES....John i paid $130.00 for my plating experiment....live and learn......

yeh,,bummer about the plating.....but that was yesterday.....but to-day the frame is etched primed....battle-ship grey and it looks 100%.......

my built is very much a work in progress.....trial by error/learning....
 
tri-lobe said:
hello John in CR....

thanks for the throttle set info.....is that $20.00 for the set....ie $10.00 per item????.......

i can get a joinning link at my lbs for $10.00....

YES....John i paid $130.00 for my plating experiment....live and learn......

yeh,,bummer about the plating.....but that was yesterday.....but to-day the frame is etched primed....battle-ship grey and it looks 100%.......

my built is very much a work in progress.....trial by error/learning....

Under $10 for the set. I paid $5 plus shipping and taxes. Let me make sure I have a gold one stateside before committing to anything. Things I bring into CR never pay to send back out. I just saw your gold accents, and I thought if the colors were close, then matching handles would be a nice touch.

I need to send the guy a note, because it's been months since I ordered the AL throttles and when I did I campaigned for some with natural aluminum, since to me it would have broader appeal than any of the colors they had. That might even go with your battleship grey.

John
 
hello members....

great day to-day....got 2 twenty min rides in this afternoon......truely chuffed....everything worked smoothly....no grief....

chalk and cheese compered to my 400w hubmotor.....the gng kit much more fun...my bike is now spritely and faster.....

it's still early days and i still have a few things to make....ie guards for belt and primary chain and controller.....but the bike is rideable...

i need to mount a speedo....i'll get one this week so that next weekend i shall be able relieably measure top speed....

my first impression of the Sturmey Archer 3 speed hub is......impressed.....changes up and down well.....handles my low powered set-up...but it is early days..

i found that when changing up...i could have the throttle lightly on then change.....it was like an automatic transmission....smoothly increase in speed at that light thottle postion.......i back off the throttle to change down....IMG_0253 (640x480).jpg


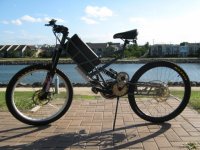
i took a some pic's on my second ride....View attachment 1IMG_0256 (640x480).jpg
 
Awesome...since you are giving the motor some gears to work with, I will be very interested to hear the Cycleanalyst data whenever you can manage to post that. Got it finished just in time for the improving weather!
 
hey spinningmagnets....

the crank sprocket set-up is not quiet there...ie in top gear...the last 30% i cant peddle fast enough to contribute...should i want too.

the whole set-up is no louder than my hub motor....all i could hear was the wind zooming past my ears....

cant wait to get some measuring gear on to see whats really happening...
 
tri-lobe said:
in top gear...the last 30% i cant peddle fast enough to contribute...should i want too.
That isn't that much a disadvantage IMO if the speed is enough for you, just throttle down a little. PWM of most controllers works quite efficient near the top end.

Nice to see such a great project almost finished!
 
...the last 30% i cant peddle fast enough to contribute...should i want too.

For street riding, I think the easiest way to add pedaling is to reduce the voltage to 10S / 37V. With LiPo (or a very large pack of any other chemistry), the extra amps drawn at 36V / 37V (as compared to 44V / 48V) will not be a problem. Worst case is to have a small 10-Ah generic 1C LiFePO4 pack and geared for a high top-speed.

My immediate reaction to reading this, is that you should swap-in a larger pulley, but I see the chainstay interferes with doing that. The next thing to consider is swapping-in a larger motor-chainring, (both of these suggestions will reduce the pedal cadence by adding more motor-reduction while keeping 48V) but I see you are already running a fairly large tooth-count.

For off-road it's great to keep the higher 48V, and swap in a larger gear-spread on the rear sprocket cassette to lower the bikes speed range for low-speed crawling on steep uphills (with the motor remaining cooler by staying in its top-RPMs), but that doesn't help the pedal-cadence. Christerljung is getting great off-road performance at 72V x 30A, but...in the upper half of the motor-RPMs it's pretty much just a scooter and the pedals are foot-rests.

If you are feeling ambitious, you could swap-in #25 / #219 chain on the primary. They are fairly quiet when exposed, and after you add a mud cover, they are as quiet as the belt (or so I've been told) The chain-primary swap will add significant reduction. it also has the benefit that you never need to worry about a power burst shredding the belt. Try to source a 12mm bore 11T/12T "B"-style sprocket, bore it yourself, or ask LightningRods if he has started making them yet. If not, you can buy a cheap #25 spocket off-the-shelf at a 10mm bore.

Soon, LightningRods has stated he's making motor-shafts that are already turned down to 12mm, and he will stock 12mm bore sprockets, plus 12mm bore jackshafts.
 
Any more updates on your project?
 
Hello members...

bit of an update ....I made 3 fiberglass guards......1 for the controller..1 for belt drive side...1 for the chain drive side....IMG_0259 (640x480).jpgIMG_0260 (640x480).jpgIMG_0258 (640x480).jpg


All of the guards have 3 mounting points and are solidly attached...I can kick the guards with my boot and they don't move...plenty of room for adjustments as well..

I will probably do some fancy milling in the guards at a later date....but for now I or any one else can ride the bike safely...

the 15mm drive belt is holding up well..no fraying of the edges...the 18t pulley and good belt alignment seems to be the answer.....

I will eventually replace all the chinese bearings and freewheels with better items....

top speed is 40kph....the sturmey archer hub so far is working well for my city riding....I can ride up long flights of stairs no problems....
 
Beautiful build tri-lobe! I followed your thread for a while when you were just getting started on your frame. It's really all come together nicely.

I do make a laser cut #219 chain adapter that will allow you to lower your secondary reduction by about 40% with the same diameter BB sprocket. It would fit in your nice 'glass cover and everything. I've also been working on the primary belt side but none of that would fit in your cover. Your main issue in converting to 219 would be that the freewheel needs to move over to the primary driven. How hard is it to make those covers? :lol:

Here are some pictures of the 219 adapter. My first one is for four bolt freewheels which it looks like you're using. I'll also be making one soon for the five bolt ACS and White Ind/SBP freewheels.

219s.jpg


219-1.jpg
 
Hello lightening rods...

the guards were easy to make.....I first off made cardboard templates to see how things would sit/mount...then I made 2 simple timber forms to lay the glass onto....I gave them 2 layers of course matting because I wanted the guards to be strong......it was that simple....

I've been keeping an eye on your creations and have your website in my favorites for future reference.....I decided early on in my build to stick to basically what came with the gng kit ie 15mm belt and bmx chains....my reason was that I had enough work on my plate bushing and threading items to remove the bloody sloppy fits on critical spinning items.....sort out this crap first and make it work correctly with the idea that once the bike was finished I could change sprockets etc to suit my needs.
 
tri-lobe said:
the guards were easy to make.....I first off made cardboard templates to see how things would sit/mount...then I made 2 simple timber forms to lay the glass onto....I gave them 2 layers of course matting because I wanted the guards to be strong......it was that simple....
I've been keeping an eye on your creations and have your website in my favorites for future reference.....I decided early on in my build to stick to basically what came with the gng kit ie 15mm belt and bmx chains....my reason was that I had enough work on my plate bushing and threading items to remove the bloody sloppy fits on critical spinning items.....sort out this crap first and make it work correctly with the idea that once the bike was finished I could change sprockets etc to suit my needs.

I've been watching what Denisesewa does on her builds with laid up panels for months. As soon as I get my current pile of projects under control I'm going to experiment with hand laid and vacuum formed panels. These really look great and give a 'factory' look to the builds. Plus for safety, noise reduction and keeping crud out of the drives they're a great addition.

When doing a build it's always hard to know what to do first so that you won't have to redo half of it. You're in a good position to go whichever way you want to on your drives now. You've limited yourself on driven pulley choices a bit with that nice cover you made, but that will sort itself out. I'm going to paste a section of the PM that I sent you on #219 driveline parts for the Forum to have as reference.

Going from a 48T 1/2" to a 52T 1/2" BB sprocket gained 8% in reduction. The diameter also increased from 7.65" to 8.28". Going from a 48T 1/2" to an 80T #219 BB sprocket gains 66% in reduction with no increase in sprocket diameter. That's what I'm talking about. If you want to match the size of your 52T in 219 you could use an 87T. That's an 81% reduction over the stock 48T! All of the kart sprockets from 65T to 93T use the same 5 1/4" bolt ring diameter that I designed into my adapter plate.

There is such a need for standards to make all of these bicycle/scooter/kart/motorcycle drive parts compatible that I'm going to focus on it. Choices have been very limited and many of them not well suited to e-bikes.
 
hello LightningRods..

thank you for your replys.....things are now a lot clearer in the sprocket and ratio department ...I sometimes have trouble seeing the forest because of the trees.

the 87t in the 219 style sounds perfect, so I think that's the way I will go, add a quality freewheel at the bb at the same time = a better set-up.

in regards to fiberglassing....I find it easy to work with even though it's stinky and can make you itchy when one sands or grinds the item....

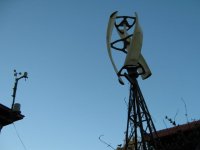
a bit off topic in regards to my bike build......I wanted to make a windmill of the vertical helix style with 3 blades....I could not purchase anything to suit or mod to meet my needs so there was no option but to make my own.

so I made up a timber former 1.2m long x 150mm wide and hand layed matting and resin onto it in the backyard and this was the resultIMG_0264 (640x480).jpg

the blades are 2mm to 2.5mm thick and weigh in at around 750gm each....I was really pleased with the result...I had never done anything like this before.
I've clocked the mill at over 520 rpm in 25kph winds ....so now i'm not concerned about working with fiberglass at all....

back on topic....should I decide to mod the belt drive side with a larger dia pulley ie 95t its no worrys to whip up another guard to suit....1 days work with a beer in my hand.

upon re-reading this thread I find that Spinningmagnets offered the same advice that you have.....so to both you gentlemen....thankyou very much.
 
Hello 1KW.

Yes...i'm in the middle of doing the #219 conversion....have just received the last of the parts that I needed...

had to make a freewheeling 13t sprocket... to go with a 93t sprocket attached to a Lightningrods adaptor plate.

i'll get some pics up over the next couple of days....
 
Hello members...

I wanted to follow a suggestion by Spinningmagnets and LightningRods in regards to the #219 conversion.....

and this where i'm at...View attachment 4IMG_0294 (640x480).jpg

a homemade freewheeling 13t sprocket ......driving a 93t sprocket [ soon to be changed to a 86t ]....mounted on an adapter plate by LightningRods.....

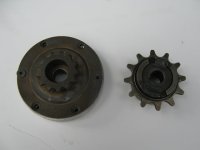
an important issue to solve was a freewheeling drive sprocket....a replacement for the fanphy....but with the 13t #219 sprocket attached.....IMG_0295 (640x480).jpgView attachment 1

a crossfire freewheel held captive by a suitable housing that also permitted the mounting of the 13t drive sprocket......
.

I still have a bit of work to do....finnish off the jack shaft to suit new diamentions....swap 44t sprocket for a 48t for the final drive.... bmx chainline....

I'll update as I can...
 
Hello members..

an up-date for the #219 conversion....

all modifications have been done...and there was quite a few to sort out...but everything is spinning straight and true and alignments are good.
the bike's ready to test-ride and it's flogging down rain to-day......and tomorrow apparently....@#$%^&*....

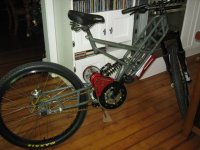
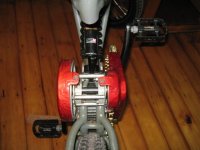
I revisited my guards with slots and a splash of candy apple red.....they were a bit drab in black with blank faces.
L/R's adaptor plate along with some other steel parts will get plated light gold after I have proven the set-up after a couple of rides...

a pic of the bike to-day....all dressed up and no where to go......batterybox is in the shed drying,she got another coat of black...IMG_0316 (640x480).jpgIMG_0315 (640x480).jpg

i'll report back once I have something to report back on ie.....after a ride.
 
Hello members,

I managed 2 x 20min rides yesterday afternoon.....everything went well,no problems or issues.
I am now able to pedal at top speed.....45kms.
the whole set-up is very quiet....nobody hears me coming up from behind...

with the 3 speed hub that i'm using plus the #219 conversion ......yesterdays rides stayed in 2nd and top gear for the street rideing I was doing and 1st gear was not used.....there was no need on flat steets.

I enjoy pedaling with the bike now, I can now contribute in a positive way to the bicycles performance....

i'll report back when I have some more news.....
 
Hey members...

well my home made bicycle is running like a champ....I love it...I get home from rideing and my hearts pumping, I have a grin from ear to ear....well worth all the work.
it's great for around town....I just pass the cars when their caught up in the slow moveing traffic....a very nice sense of freedom....

IMG_0322 (640x480).jpg

I'm glad that I did the #219 chain conversion, it was a step in the right direction for me.
my belt drive has been trouble free....I'm glad that I did the mods and stayed with the belt....
the Sturmey Archer 3 speed hub is running as smooth as silk....no problems there..

of cause all the above is just my personal opinion.....I now want to see how things hold up over time as the km's are clocked up....
 
I'm jealous, beautiful work! You fellas are getting into the Aussie summer right now (we just got our first snow last week). When I get rich, I'll have to get a winter home there, and maybe a summer home in Croatia, near the coast of the Adriatic Sea?
 
Back
Top