
You mentioned capacitors a couple of times. Capacitors don't just blow and their size is determined by the required specs for the circuit. Is the controller getting hot.If you know of a 22" fat tire wheel mounted on a 18" motorcycle rim with a great motor that is paired up with a great controller with larger capacitors than necessary that can easily be programmed down to 30 amps please let me know!!!
-
Howdy! we're looking for donations to finish custom knowledgebase software for this forum. Please see our Funding drive thread
You are using an out of date browser. It may not display this or other websites correctly.
You should upgrade or use an alternative browser.
You should upgrade or use an alternative browser.
Controller for Bafang 750 watt motor
- Thread starter bpmcallorum
- Start date
bpmcallorum
10 mW
I was being too simple. I know it's not that simple. I'm just a few months into this. I'm learning about mosfets, thermal rollback, understanding phase amps more, and a hundred other things. I took an electrical engineering major for a couple years and switched majors. I hate that I have to become an electrical engineer to get my e-bike to run. To be simple....I know damn well I push my bike more than a controller that is rated at 35 amps can handle. Even though I want one to just run it at about 30 amps continuous. Yes, I put it inside a bag with 3 inches of space all around it......I go out in complete downpour rain to get to work. I also have a strong 75 watt LED light on a 12V stepdown. But I have had controllers blow during the day. They also break for other reasons. I believe I had 2 controllers break from just not plugging in the Anderson plug poles at the exact same time. This guy "V" at Powerful Lithium explained it to me. He is the most helpful and most intelligent guy I've met in this game. But of course, getting my controller to work is more of a job for a local EE. I met one local EE guy who is not currently answering me. So I've met nobody local.You mentioned capacitors a couple of times. Capacitors don't just blow and their size is determined by the required specs for the circuit. Is the controller getting hot.
AGS
1 kW
There are many things that you need to take into consideration when doing a build or modification to make it reliable and not blow up all of the time, and Anderson connectors are another problem.
They will always spark when connecting a battery to a controller with discharged capacitors. So the solution to that problem is to replace them with anti spark XT60 or XT90 connectors. That will eliminate sparking when connecting your battery to the controller and will charge up the capacitors in the controller more gently.
Then you move on to the next problem to be solved.
Last edited:
bpmcallorum
10 mW
I had an XT90 connector originally.There are many things that you need to take into consideration when doing a build or modification to make it reliable and not blow up all of the time, and Anderson connectors are another problem.
They will always spark when connecting a battery to a controller with discharged capacitors. So the solution to that problem is to replace them with anti spark XT60 or XT90 connectors. That will eliminate sparking when connecting your battery to the controller.
And then you move on to the next problem to be solved.
It had bad solder points and it broke on the way to work one day. They seem fragile. I had to wire nut stuff together just to get to work.
After that I talked to my Electrical Engineer friend and I moved to 55AMP Anderson plugs for my battery. Same goes for that small power connector on the Bolton Controller. I replaced that with an Anderson 55AMP connector.
It seemed like good power plug for a 30amp system? But thank you so much I will look into "ANTI-SPARK CONNECTORS".
AGS
1 kW
Wow, you have had your troubles. And it definitely helps if you know how to solder properly.
The currents associated with e-bikes is very high and bad/dry solder joint’s won’t last long especially on a bike that vibrates a lot when ridden. It’s even worse on bikes with no suspension.
The currents associated with e-bikes is very high and bad/dry solder joint’s won’t last long especially on a bike that vibrates a lot when ridden. It’s even worse on bikes with no suspension.
AGS
1 kW
Ooh I just looked at your avatar properly.
That is a heavily laden bike, so I can see why you use throttle only. It’s the size and weight of a moped and it’s only got an engine designed for a bicycle.
That is a heavily laden bike, so I can see why you use throttle only. It’s the size and weight of a moped and it’s only got an engine designed for a bicycle.
I'd invest some time in sealing up the controller so you can get it out of the bag. Even if you get a big monster controller, the heat will still build up if it's kept enclosed. Even a small amount of airflow can make a big difference if you're running at full tilt all the time.
bpmcallorum
10 mW
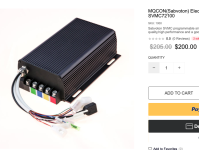
Thank you so much for your attention to my problems. Again exactly which “controller” I “seal up” is where I am at. Right now I’m still looking at the Sabvoton 72100 the most just because I do not have a PC to program a Kelly. Kelly seems to have 2 levels of waterproofing though.I'd invest some time in sealing up the controller so you can get it out of the bag. Even if you get a big monster controller, the heat will still build up if it's kept enclosed. Even a small amount of airflow can make a big difference if you're running at full tilt all the time.
bpmcallorum
10 mW
For the record I did not do the crappy solders on my XT-90 that broke. It came with my battery.Wow, you have had your troubles. And it definitely helps if you know how to solder properly.
The currents associated with e-bikes is very high and bad/dry solder joint’s won’t last long especially on a bike that vibrates a lot when ridden. It’s even worse on bikes with no suspension.
999zip999
100 TW
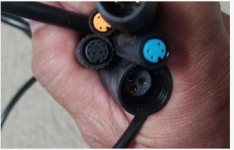
Are you sure you only have three wires I know in the center of the black pin you have three wires but look along the sides is there five or 6 slots for the five Hall sensor wires and maybe a temp wire that would be inside the plug and the connections are along the side wall of the plug.
I'm just saying you might actually have a whole sensor motor and haven't looked at the plug clearly.
Maybe.
What controller are you running now can we see that plug and the plug to the motor how about a pic.
I'm just saying you might actually have a whole sensor motor and haven't looked at the plug clearly.
Maybe.
What controller are you running now can we see that plug and the plug to the motor how about a pic.
Last edited:
999zip999
100 TW
Well you can always get a motor of your choosing get the rim of your choosing and get some quality spokes and have yourself or somebody else lace the rim.
I would make sure all this fits on your bike where you wanted to fit before you spend the money and buy you'll probably have to buy some connectors and I guess you have a multimeter and voltmeter.
Remember this is a do-it-yourself website and we might even ask you to lace your own rim.
I would make sure all this fits on your bike where you wanted to fit before you spend the money and buy you'll probably have to buy some connectors and I guess you have a multimeter and voltmeter.
Remember this is a do-it-yourself website and we might even ask you to lace your own rim.
bpmcallorum
10 mW
Are you sure you only have three wires I know in the center of the black pin you have three wires but look along the sides is there five or 600 slots for the five Hall sensor wires and maybe a temp wire that would be inside the plug and the connections are along the side wall of the plug.
I'm just saying you might actually have a whole sensor motor and haven't looked at the plug clearly.
Maybe.
What controller are you running now can we see that plug and the plug to the motor how about a pic.
Attachments
bpmcallorum
10 mW
48 - 60v 750w Bafang geared rear hub motor
This rear-drive motor, which is compatible with the disc brake, has a rated power of 250-750W, a reduction ratio of 1: 5 and a maximum torque of 80 N.m, providing ideal power for vehicles. Strong and efficient, this motor, working together with a fre
electrobikeworld.com
bpmcallorum
10 mW
750w motor cable
750w motor cable with female plug, has 9 wires in total and can be spliced to our 25 and 35a controller to extend the motor cable.
electrobikeworld.com
I was thinking of getting that cable.
bpmcallorum
10 mW
Are you sure you only have three wires I know in the center of the black pin you have three wires but look along the sides is there five or 600 slots for the five Hall sensor wires and maybe a temp wire that would be inside the plug and the connections are along the side wall of the plug.
I'm just saying you might actually have a whole sensor motor and haven't looked at the plug clearly.
Maybe.
What controller are you running now can we see that plug and the plug to the motor how about a pic.
750w motor cable
750w motor cable with female plug, has 9 wires in total and can be spliced to our 25 and 35a controller to extend the motor cable.
electrobikeworld.com
999zip999
100 TW
So I think I see brass pins inside on the outer walls those are in the plug that run to hall sensors in the motor. I think you do have a hall sensor motor. You can use that plug it's made for 22amps or so .Meaning it could get hot on long hill. What kind of use is this cargo bike on and how many people and pounds are you pulling and is it flat land or hills ?
Me I just cut that plug off put 4 mm bullets on the ends and put a 6 pin jst plug for the hall wires that is if you have a hall sensored motor I'm still kind of guessing on that
Me I just cut that plug off put 4 mm bullets on the ends and put a 6 pin jst plug for the hall wires that is if you have a hall sensored motor I'm still kind of guessing on that
bpmcallorum
10 mW
Did you see the extension cable I posted with the 9 wires?So I think I see brass pins inside on the outer walls those are in the plug that run to hall sensors in the motor. I think you do have a hall sensor motor. You can use that plug it's made for 22amps or so .Meaning it could get hot on long hill. What kind of use is this cargo bike on and how many people and pounds are you pulling and is it flat land or hills ?
Me I just cut that plug off put 4 mm bullets on the ends and put a 6 pin jst plug for the hall wires that is if you have a hall sensored motor I'm still kind of guessing on that
999zip999
100 TW
Ok I only heard you confirm 3wires sorry. Communication bump. In the past I've cut mine off put 4 mm gold plated for the phase wire and a six pin jst plug. But now I'm leaving the big white plug on for the hall sensors because that's what those cheap e-bike testers have. Funny to be going for that big white plug
bpmcallorum
10 mW
"What kind of use is this cargo bike on and how many people and pounds are you pulling and is it flat land or hills?"So I think I see brass pins inside on the outer walls those are in the plug that run to hall sensors in the motor. I think you do have a hall sensor motor. You can use that plug it's made for 22amps or so .Meaning it could get hot on long hill. What kind of use is this cargo bike on and how many people and pounds are you pulling and is it flat land or hills ?
Me I just cut that plug off put 4 mm bullets on the ends and put a 6 pin jst plug for the hall wires that is if you have a hall sensored motor I'm still kind of guessing on that
I GENERALLY RIDE IT TO WORK ON BIKE PATHS. MAYBE 1/3 OF THE TIME I'M ON THE ROAD WITH CARS. MY COMMUTE IS NOT HORRIBLY HILLY. WHEN I WAS RUNNING A 35 AMP BOLTON CONTROLLER I WAS GETTING UP TO ABOUT 38 MILES PER HOUR ON FLAT.
IT'S 2 PERSON BIKE. AND ON DAYS OFF I HAVE CARRIED MY FRIEND WHO WEIGHS OVER 250 ALL OVER TOWN. 35 MILES ONE DAY. THE ODD THING IS MY CONTROLLER DID NOT BREAK THAT DAY.
BUT I CAN TELL MY CONTROLLER BREAKS FROM USAGE BECAUSE IT HAS BROKEN SO MANY TIMES AT THE END OF A VERY LONG RIDE.
bpmcallorum
10 mW
I said 3 wires because I have one wire that looked initially like it just had 3 female ports. I think I was wrong. I think that extension cable shows all the wires. I went ahead and ordered it.Ok I only heard you confirm 3wires sorry. Communication bump. In the past I've cut mine off put 4 mm gold plated for the phase wire and a six pin jst plug. But now I'm leaving the big white plug on for the hall sensors because that's what those cheap e-bike testers have. Funny to be going for that big white plug
IS THIS PLUG ON THE SABVOTON 72100 A "SIX PIN 'JST' PLUG"?
Attachments
bpmcallorum
10 mW
Are you sure you only have three wires I know in the center of the black pin you have three wires but look along the sides is there five or 6 slots for the five Hall sensor wires and maybe a temp wire that would be inside the plug and the connections are along the side wall of the plug.
I'm just saying you might actually have a whole sensor motor and haven't looked at the plug clearly.
Maybe.
What controller are you running now can we see that plug and the plug to the motor how about a pic.
You can see all about the controller at...
35a controller Rad
Looking for more power, acceleration and torque for your Rad bike? Introducing our new 35a controller upgrade plug and play to the Rad bikes. Instantly take your bike to a whole new level of performance you've been asking for. This 35a controller mus
electrobikeworld.com
Attachments
For that, you can simply relace your rim onto the new motor. It's pretty easy to do if you research it first, and practice at least once by unlacing and relacing a discarded wheel (which aren't too hard to come by). There are quite a few posts and threads around here about that, and websites like Sheldon Brown's that have tons of bicycle maintenance and build info, or online videos if you prefer that form of learning. Even if you are using motorcycle spokes and rim, the same info still applies as it's still a spoked rim using the same principles. (learning this skill also means you can fix your own wheels when stuff goes wrong, and you may even get good enough at it to earn money building wheels for others).If you know of a 22" fat tire wheel mounted on a 18" motorcycle rim
<snip>
I don't mind scrapping my motor but my custom wheel size makes everything 1000x more difficult.
Normally, when a part keeps failing the same way on the same system under the same usage, there are a few potential causes of the failure:It currently feels impossible to get a good controller working on my bike honestly.
--quality of the part
--suitability / design of the part for the usage scenario
--environmental conditions
The last one is often overlooked, especially with controllers, which are designed for sufficient airflow over the heat-generating parts, and are sometimes installed inside other parts of the bike where that airflow can't happen as it is required.
The first two are unfortunately fairly common problems, but I've abused crappy controllers for years at a time on heavy-cargo bikes and trikes without blowing them up as long as they have proper cooling. Take a look at my CrazyBike2 and SB Cruiser trike threads for examples.
Regarding capacitors, it is fairly easy to replace the usually low-quality ones in controllers for better ones (Rubycon, Panasonic, etc), if necessary with higher temperature ratings and higher capacitance and voltage ratings.
It's certainly a viable option--using something at less than it's max ratings means it has a safety margin not usually built into cheap(ly designed) ebike stuff. It also gives you some room for upgrading your system later without replacing that part. Most people are too cheap to do this, so you don't see it happen very often, unfortunately.I’ve had many people who know way more than me tell me to get a much stronger controller than I need and program it down to 30 amps.
Don't forget that your battery also has to supply all the power of the system, so if you want to go faster, it will have to be able to supply the significant extra power it will take to do that work.
You can use the motor simulator at ebikes.ca to guesstimate the higher power usage (Watts) at whatever higher speed you wish to travel at under your specific riding conditions, and also guesstimate the higher usage rate (Wh/mile) you'll have at that speed. This will help you find a controller that can actually supply the power required to do the job you need done, and ensure your battery can also handle that job.
Not really. There's quite a few threads about doing this for various systems that you can look for and read up on that will help you depending on which system you go with.But it is crazy difficult to wire and program these controllers with a “foreign” motor.
Wiring is typically fairly simple as long as you have complete info on your bike's existing wiring, whether you get that from the manufacturer(s) of the bike/parts/etc., or determine it on your own and draw out your own complete system diagram for it, and you have complete info on the wiring for the new controller (and it's display that will come with it, if you want a display on the bike, since the new controller is unlikely to be compatible with your existing display).
If you are not sure which signals to connect together, you can post all the required info to do that here in this thread and we can then help you determine which signals match up, and which, if any, are to be left disconnected and unused.
If the connector styles don't match, you can usually cut the connectors off the part(s) you are replacing, after you have traced their pins back to the points inside that the wires are soldered to, so that you know which pins are whcih functions (unless you already have this info in your bike system diagram), so you can connect the correct wires together between connector and new part(s).
The Sabvoton 72100 looks like I can at least program it from my iPhone via Bluetooth.
Keep in mind that some controllers' apps can't change all the settings that the computer based version can, so check out the app vs program settings to be sure the things you will want to change are available to you in the app. I don't know enough about the Sabvoton app to say, but Siaecosys is the source for manufacturer information on those.
My motor only has 3 wires and this says it’s not for me.
In fact it only has ONE wire…..with 3 pins (sub-wires)
As someone else has pointed out, it's pretty likely that yours does indeed have hall sensors, just that you haven't noticed the contacts for them on the connector shell. I think your motor has this
Connectors - Learn
There are lots and lots of connector types used in the ebike industry, so many that it would be a very tall order to try and list them all. In our business, we focus just on aftermarket conversion kits and have tried to keep the connector styles down to a well chosen minimal set. This page...
 ebikes.ca

or some variant; it's what I've seen on the other Rad motors posted about. You can verify this, and even test the hall sensors for functionality if you like, using the info in the Learn Troubleshooting section at ebikes.ca.
bpmcallorum
10 mW
For that, you can simply relace your rim onto the new motor. It's pretty easy to do if you research it first, and practice at least once by unlacing and relacing a discarded wheel (which aren't too hard to come by). There are quite a few posts and threads around here about that, and websites like Sheldon Brown's that have tons of bicycle maintenance and build info, or online videos if you prefer that form of learning. Even if you are using motorcycle spokes and rim, the same info still applies as it's still a spoked rim using the same principles. (learning this skill also means you can fix your own wheels when stuff goes wrong, and you may even get good enough at it to earn money building wheels for others).
Normally, when a part keeps failing the same way on the same system under the same usage, there are a few potential causes of the failure:
--quality of the part
--suitability / design of the part for the usage scenario
--environmental conditions
The last one is often overlooked, especially with controllers, which are designed for sufficient airflow over the heat-generating parts, and are sometimes installed inside other parts of the bike where that airflow can't happen as it is required.
The first two are unfortunately fairly common problems, but I've abused crappy controllers for years at a time on heavy-cargo bikes and trikes without blowing them up as long as they have proper cooling. Take a look at my CrazyBike2 and SB Cruiser trike threads for examples.
Regarding capacitors, it is fairly easy to replace the usually low-quality ones in controllers for better ones (Rubycon, Panasonic, etc), if necessary with higher temperature ratings and higher capacitance and voltage ratings.
It's certainly a viable option--using something at less than it's max ratings means it has a safety margin not usually built into cheap(ly designed) ebike stuff. It also gives you some room for upgrading your system later without replacing that part. Most people are too cheap to do this, so you don't see it happen very often, unfortunately.
Don't forget that your battery also has to supply all the power of the system, so if you want to go faster, it will have to be able to supply the significant extra power it will take to do that work.
You can use the motor simulator at ebikes.ca to guesstimate the higher power usage (Watts) at whatever higher speed you wish to travel at under your specific riding conditions, and also guesstimate the higher usage rate (Wh/mile) you'll have at that speed. This will help you find a controller that can actually supply the power required to do the job you need done, and ensure your battery can also handle that job.
Not really. There's quite a few threads about doing this for various systems that you can look for and read up on that will help you depending on which system you go with.
Wiring is typically fairly simple as long as you have complete info on your bike's existing wiring, whether you get that from the manufacturer(s) of the bike/parts/etc., or determine it on your own and draw out your own complete system diagram for it, and you have complete info on the wiring for the new controller (and it's display that will come with it, if you want a display on the bike, since the new controller is unlikely to be compatible with your existing display).
If you are not sure which signals to connect together, you can post all the required info to do that here in this thread and we can then help you determine which signals match up, and which, if any, are to be left disconnected and unused.
If the connector styles don't match, you can usually cut the connectors off the part(s) you are replacing, after you have traced their pins back to the points inside that the wires are soldered to, so that you know which pins are whcih functions (unless you already have this info in your bike system diagram), so you can connect the correct wires together between connector and new part(s).
Keep in mind that some controllers' apps can't change all the settings that the computer based version can, so check out the app vs program settings to be sure the things you will want to change are available to you in the app. I don't know enough about the Sabvoton app to say, but Siaecosys is the source for manufacturer information on those.
As someone else has pointed out, it's pretty likely that yours does indeed have hall sensors, just that you haven't noticed the contacts for them on the connector shell. I think your motor has this
View attachment 333101Connectors - Learn
There are lots and lots of connector types used in the ebike industry, so many that it would be a very tall order to try and list them all. In our business, we focus just on aftermarket conversion kits and have tried to keep the connector styles down to a well chosen minimal set. This page...
or some variant; it's what I've seen on the other Rad motors posted about. You can verify this, and even test the hall sensors for functionality if you like, using the info in the Learn Troubleshooting section at ebikes.ca.
Thank you so much. That is certainly a lot of information. I am interested in wheel building.
However, I mostly wish I could just get a new controller working...like really really soon.
I HAVE NO OTHER WAY TO GET TO WORK.
I'm thinking now maybe I should get a Kelly controller because of their waterproofing and reputation.
And buy a cheap PC so I can program it. I do not think they work with Macintosh. And they will not answer that question.
I promise I have looked at a ridiculous amount of websites and videos about wiring and programming the Kelly controllers.
THEY MADE ME MORE AFRAID TO DO IT.....NOT LESS.
Well that changes things, doesn't it?I said 3 wires because I have one wire that looked initially like it just had 3 female ports.
Mount the next controller outside of the bag and see if you can break it.
Similar threads
- Replies
- 9
- Views
- 273
- Replies
- 0
- Views
- 74
- Replies
- 31
- Views
- 3,314