Kawasaki Ninja 250 build

peadar

100 W
Joined
Nov 9, 2022
Messages
187
Location
NE Atlanta
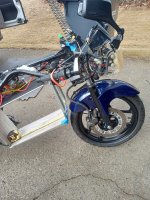
QS8kw v4. 17"/3.5"hub motor.
Fardriver controller 96850.
Looking for Chevy volt modules/2 96 v.
Charger for same,low power?
Not sure about bms?
Need DC to DC converter.
IMG_20221226_134753957_HDR.jpgIMG_20221226_133742634_HDR.jpgIMG_20221226_134702612_HDR.jpgIMG_20221226_133554713_HDR.jpgIMG_20221226_134249755_HDR.jpg IMG_20221226_133523825.jpg
 
I'm not sure if this is a visual effect from the picture, but it looks like you don't have enough clearance for the front suspension travel.
Have you tried to fully compress the fork to check wether it will hit the battery or not?

For the BMS I recommend the ANT BMS, it's cheap and relatively reliable, works reasonably well.
 
I put extra pvc spacer in fork tubes and new fork oil, 4 1/2' max travel its close, and droped the forks a 1/2' , its tight ,will have try under hard braking. uinistrut sticks out, will change to flat stock./
will look into ant bms thanks, looking for someone that has 96v chevy volt modules and how to manage them, there is alot of 72v stuff ,i thought 96v so i would have lower amps and more speed.
 
To check the max compressed clearance just remove the fork caps.
Get something to support the bike so it doesn't fall, of course, then remove the caps and then the springs.
Then you'll be able to compress the fork without effort. :wink:

Either that or a ratchet strap, that works too, but not everyone has one of those around.
 
Good idea, will do. What advantage does canbus have when it comes to bms, fardriver has canbus! not sure what it does, Got to get battery first . then bms
still looking.
getting info from Fardriver is not working.been looking for manual for 96850 and the PC program from them.
the wiring on line showes all the wires but not how to wire them?
 
It's all the way down, 5" .got an inch or more to take any flex, I expect 3 or so inches max on street once I work on suspension
 
The engine on these bikes is a stressed-member.
The battery frame on this build will not serve as a stress member.
It would be MUCH better to weld it up with chrome-moly tubing, and add some diagonal bracing.
It might be necessary for said bracing to bolt on one side to allow installing and removal of the batteries.
Or maybe install the batteries into the frame before bolting the frame to the main frame.

OP: I really hope you intend on getting some proper crimp terminals for this connection I've circled in green. :shock:


free image hosting
 
The top of battery box is connected to the back engine mount and the front making an A frame type truss.
The wiring is a mockup for wire length and testing,
Should i be looking in welding supplies or audio cable ,what works best?
Thanks
 
Trying to wire side stand switch NC contact, I am guessing the park wire ,l might need NO contact, because it works with nothing connected?
 

Attachments

  • IMG_20230102_101826239_HDR.jpg
    IMG_20230102_101826239_HDR.jpg
    1.7 MB · Views: 210
peadar said:
The top of battery box is connected to the back engine mount and the front making an A frame type truss.

This is true, yes, and the battery itself the way you have it pictured won't fall out. The problem is that the engine used to function as an integral structural member, to keep the frame from bending and cracking. You've removed this solid structure and replaced it with bolted-together struts. Not even close to the level of structure that the engine used to provide.

All frames are different, so the thing is, you might be ok with what you done. Depending on how well the original frame was made, with what material, the quality of the original welds. If you stay under 35mph and never hit any potholes. But the faster you go, and the harder you ride it, the more likely you are to bend and stress that top "spine" part of the frame.
Document.jpg
When you hit a bump, this section that I've circled in yellow is going to take the entirety of the force transferred to the frame. It'll try to bend like a hinge, because the engine used to reinforce that section, and the metal bars you're using for the battery are not a suitable replacement for the structure that the engine used to provide.
 
I will replace with 2 peices of angle iron,
And run a flat bar between bottom engine mount and front engine mount, don't have battery yet, it could change layout .
I would like to buy local but where
No info at dealer .Atlanta is big enough any idea?
 

Attachments

  • IMG_20230103_092402503.jpg
    IMG_20230103_092402503.jpg
    2 MB · Views: 189
Nice project but I agree with the other posters that the original engine was part of the frame structure and strength. Please make the suggested reinforcements so you'll be safe!
 
I bought a circuit breaker for emergency kill switch but the push to trip doesn't work, I also have a pull push switch , which one would work better?
Thanks
 

Attachments

  • 20230328_111130.jpg
    20230328_111130.jpg
    1 MB · Views: 13
I will replace with 2 peices of angle iron,
And run a flat bar between bottom engine mount and front engine mount, don't have battery yet, it could change layout .
I would like to buy local but where
No info at dealer .Atlanta is big enough any idea?

Nice project but I agree with the other posters that the original engine was part of the frame structure and strength. Please make the suggested reinforcements so you'll be safe!
New battery box not finished yet, but working good,
Got an R6 shock ,stock one was too soft.
added stop on side stand and add a bit to the height,
 

Attachments

  • IMG_20230624_100223457_HDR.jpg
    IMG_20230624_100223457_HDR.jpg
    2.3 MB · Views: 11
  • IMG_20230624_095808916_HDR.jpg
    IMG_20230624_095808916_HDR.jpg
    3.4 MB · Views: 10
  • IMG_20230624_095914098_HDR.jpg
    IMG_20230624_095914098_HDR.jpg
    1.5 MB · Views: 11
Back
Top