TSDZ2 EBike wireless standard (like Specialized Turbo Levo) - OpenSource

rananna said:
]
Ok, I will make the mods and do a pull request again the master branch.

One other thing, how would you like to implement a manual DFU reboot? The board button might be inaccessible in the final packaged ebike so my thought is to wire a small button to a GPIO for this purpose.
What do you think?
 
rananna said:
rananna said:
]
Ok, I will make the mods and do a pull request again the master branch.

One other thing, how would you like to implement a manual DFU reboot? The board button might be inaccessible in the final packaged ebike so my thought is to wire a small button to a GPIO for this purpose.
What do you think?
The idea is to be as DIY as possible, least solder possible and least need to buy extra components, so, I think we should use the existing board button, BUT, maybe you can also check for other input pin where we can solder another button.

I still don´t know if we will use a big button to turn on/off the system or simple we will turn on/off by wireless... and that button should be the same for enter bootloader.
 
casainho said:
I still don´t know if we will use a big button to turn on/off the system or simple we will turn on/off by wireless... and that button should be the same for enter bootloader.
My thought is to use the remote control to turn power on/off by the 'always on' bluetooth on the controller, so IMO there is no need for extra hardware buttons near or on the motor. The remote control can already do into dfu mode by button control. We can do the same for the controller by sending a command,

The bootloader hardware button was always intended as a failsafe if the firmware fails for some reason and bluetooth is not operational.
This might happen from a bad dfu update, but crc checking should prevent this from occurring.
Maybe a hardware button is unnecessary.
Anyway, we can leave this as an open question to be decided later.
 
rananna said:
casainho said:
I still don´t know if we will use a big button to turn on/off the system or simple we will turn on/off by wireless... and that button should be the same for enter bootloader.
My thought is to use the remote control to turn power on/off by the 'always on' bluetooth on the controller, so IMO there is no need for extra hardware buttons near or on the motor. The remote control can already do into dfu mode by button control. We can do the same for the controller by sending a command
I think the Specialized has a button to turn on/off on the battery, it is a button and LED. The thing is that as a user, I may prefer a big button and a light so I am sure when the system is on and when the system is off.

I understand that our wireless board may use very low power and should not be a problem to me some months always on. Anyway, the board has the button and an RGB LED that I think is important to give some feedback to user like when system is ready (green light) or had some issue like initializing the TSDZ2 (red light).

The next important feature to develop is the brake signal on the wireless remote, that is a big challenge!
 
casainho said:
.
I understand that our wireless board may use very low power and should not be a problem to me some months always on. Anyway, the board has the button and an RGB LED that I think is important to give some feedback to user like when system is ready (green light) or had some issue like initializing the TSDZ2 (red light).
Yes, the on board LED light is very convenient for indicating DFU, power status, problem indication, etc. However it does create a packaging issue to display this light to the user on the remote.

The next important feature to develop is the brake signal on the wireless remote, that is a big challenge!
Again, IMO this is more a packaging issue than a coding challenge.
Connect the brakes to GPIO, and send an ANT LEV page 16 command from the remote to the controller when brakes are activated. (Like we do for assist levels) You could also display the brake status on the board LED.
Thie ANT communication is very fast which of course, is needed for the brakes.
On the packaging side, if we can't put the board in with the button because of the need to see the LED and run brake wires, maybe a small handlebar mounted 3d printed enclosure for the board and battery could be designed to be mounted beside the remote control.
The brake and remote wires would feed into it and the board LED could be exposed for viewing. The advantage of this approach is we could put a larger battery inside to handle the potentially higher LED pwr consumption

think the Specialized has a button to turn on/off on the battery, it is a button and LED. The thing is that as a user, I may prefer a big button and a light so I am sure when the system is on and when the system is off.

We could display pwr status on both the handlebar LED and the board LED on the controller box. If that is not bright enough we could always add a big,bright LED to the controller to indicate pwr status.
 
I just added DFU to TSDZ2_wireless and made a pull request.
DFU can be entered by either pressing the board button, or by using wireless DFU either from the application or from the bootloader using the desktop or mobile versions of nRFConnect.
Bootloader will time out and return to the application if no DFU is initiated.
Give it a try and let me know of any issues you may find.
 
rananna said:
I just added DFU to TSDZ2_wireless and made a pull request.
DFU can be entered by either pressing the board button, or by using wireless DFU either from the application or from the bootloader using the desktop or mobile versions of nRFConnect.
Bootloader will time out and return to the application if no DFU is initiated.
Give it a try and let me know of any issues you may find.
I tested the TSDZ2 wireless board firmware because I am working on it, and, I can see the added delay at startup due to the bootloader. I did a great work!!

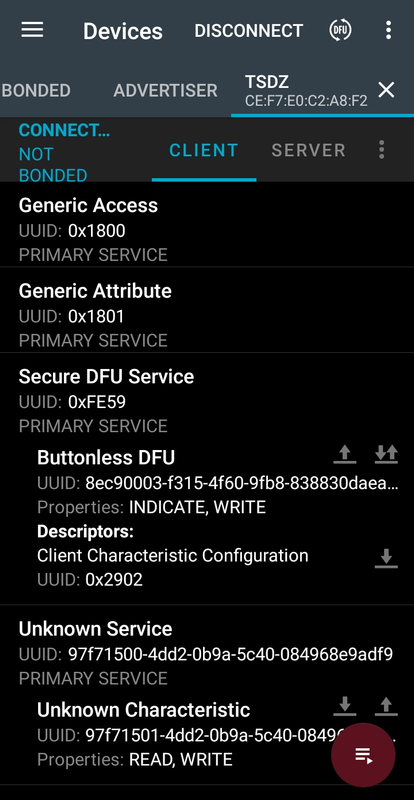
In terms of Bluetooth, I can see the added service of DFU:
image.png


And the firmware keeps working for the mobile app I am keep working on:
image.png


BUT, the firmware hangs on "Starting bootloader" once I select the ZIP file... that process stuck there. If I restart the board, then the RGB LED lights and I guess it is on bootloader.

Also, there are duplicated options that I would like to understand why you prefer like that:
- on TSDZ2 wireless board firmware, we can start the bootloader flash process using 2 options: 1. button press and 2. just start flashing as bootloader is always running on user firmware. Why keep option 1.? I would say the one everyone will want is 2.
- you say the bootloader can also be used by USB as also by Bluetooth. Why add the USB option? do you think there is add value over Bluetooth?

I am worried to have duplicated options because they need to be documented and explained to user and developers. If we can reduced to the most used and essential, I think would be better.
 
casainho said:
Also, there are duplicated options that I would like to understand why you prefer like that:
- on TSDZ2 wireless board firmware, we can start the bootloader flash process using 2 options: 1. button press and 2. just start flashing as bootloader is always running on user firmware. Why keep option 1.? I would say the one everyone will want is 2.
I agree, but I thought you wanted button access also. The button access is easily removed. Please let me know and I will do it.
Here is what you said previously:
casainho said:
The idea is to be as DIY as possible, least solder possible and least need to buy extra components, so, I think we should use the existing board button, BUT, maybe you can also check for other input pin where we can solder another button.

I see you had problems getting the firmware update to work:

casainho said:
BUT, the firmware hangs on "Starting bootloader" once I select the ZIP file... that process stuck there. If I restart the board, then the RGB LED lights and I guess it is on bootloader.
I don't see any issues with firmware updates on either the desktop or the mobile app.
Are you selecting the zip file from the build folder?
have a look at this video, are you performing the update the same way?
https://www.youtube.com/watch?v=Y8q74pekfBo

[/quote]
casainho said:
you say the bootloader can also be used by USB as also by Bluetooth. Why add the USB option? do you think there is add value over Bluetooth?
Yes, the USB option is only needed if the user wants to use the the nrfconnect programmer for unsigned firmware updates.
This is a VERY convenient way to upload firmware directly to the dongle, and I wanted to make the bootloader flexible for future use.
We can simply not document the USB option for TSDZ2 usage; it takes up negligible RAM and EEPROM space to support it.

Btw, what are your thoughts on my previous post regarding brakes?
 
rananna said:
casainho said:
Also, there are duplicated options that I would like to understand why you prefer like that:
- on TSDZ2 wireless board firmware, we can start the bootloader flash process using 2 options: 1. button press and 2. just start flashing as bootloader is always running on user firmware. Why keep option 1.? I would say the one everyone will want is 2.
I agree, but I thought you wanted button access also. The button access is easily removed. Please let me know and I will do it.
Here is what you said previously:
casainho said:
The idea is to be as DIY as possible, least solder possible and least need to buy extra components, so, I think we should use the existing board button, BUT, maybe you can also check for other input pin where we can solder another button.
Please remove the button. I wanted to say that we should use the button to enter in the bootloader BUT check for it on the bootloader and not on the firmware. So, only 2 options to enter on bootloader:
1. as you did very well DFU button less on firmware
2. button long press at startup (on bootloader).

2. is a must as 1. may fail on a incorrect firmware version, as we already talked before.

rananna said:
I see you had problems getting the firmware update to work:
I am using the ZIP file build with the same firmware flashed with STLink that I can debug. I test on 2 different phones. Please send me the file the zip file that works for you.

rananna said:
Yes, the USB option is only needed if the user wants to use the the nrfconnect programmer for unsigned firmware updates.
This is a VERY convenient way to upload firmware directly to the dongle, and I wanted to make the bootloader flexible for future use.
We can simply not document the USB option for TSDZ2 usage; it takes up negligible RAM and EEPROM space to support it.
Ok, we then should not document it.

What would be nice would be to able to use original board USB bootloader to flash our own bootloader so user would not need to solder the STLik wires.

rananna said:
Btw, what are your thoughts on my previous post regarding brakes?
Sorry, I am very busy and so I did not answer.

rananna said:
casainho said:
The next important feature to develop is the brake signal on the wireless remote, that is a big challenge!
Again, IMO this is more a packaging issue than a coding challenge.
Connect the brakes to GPIO, and send an ANT LEV page 16 command from the remote to the controller when brakes are activated. (Like we do for assist levels) You could also display the brake status on the board LED.
Thie ANT communication is very fast which of course, is needed for the brakes.
On the packaging side, if we can't put the board in with the button because of the need to see the LED and run brake wires, maybe a small handlebar mounted 3d printed enclosure for the board and battery could be designed to be mounted beside the remote control.
The brake and remote wires would feed into it and the board LED could be exposed for viewing. The advantage of this approach is we could put a larger battery inside to handle the potentially higher LED pwr consumption
Well, I thought there was always a delay of at least 250ms on ANT. If you are sure, can you please test? I think you can enable the RGB LED on the TSDZ2 wireless board and see, because a delay of 200ms or more should be clear to your eyes. If you will have the RGB LED working for indication of brakes, then the same signal can be used for the brakes.

rananna said:
We could display pwr status on both the handlebar LED and the board LED on the controller box. If that is not bright enough we could always add a big,bright LED to the controller to indicate pwr status.
I think that may be important to LED visual feedback on the remote, as the original remote of Garmin. I think your idea is good to add a box with a LED and maybe a bit bigger battery, for the remote. Without LED, my remote is working very well since maybe 2 months ago?? I am measuring the battery voltage with a multimeter and it seems stable, which is very good - I think it will work for a year at least!!
 
casainho said:
[
Well, I thought there was always a delay of at least 250ms on ANT. If you are sure, can you please test? I think you can enable the RGB LED on the TSDZ2 wireless board and see, because a delay of 200ms or more should be clear to your eyes. If you will have the RGB LED working for indication of brakes, then the same signal can be used for the brakes.

OK, so I set up a timer in the remote control firmware to measure the time between sending a page16 command and receiving an acknowledgement from the TSDZ2 ANT+ LEV device.
This time varies FROM 230ms TO 450ms. Too slow.
HOWEVER, this is the round trip time FROM the remote TO the TSDZ2 controller and BACK to the remote using the ANT protocol.
This protocol is very much slowed down in the acknowledgement due to the polling process incorporated into the ANT prototcol standard.
The important question is how fast does the TSDZ2 controller get the command to put on the brakes.
So I reversed the problem. I set up GARMIN ANT+ simulator and recorded the connection with a TSDZ2 remote controller.
As you can see from the video, the response is virtually instantaneous, as the page 16 is sent as an interrupt and is processed immediately.
So, I think this is acceptable for implementing a brake, even if there is a .3-.5 second delay before the LED comes on in the remote. video here:
https://www.youtube.com/watch?v=vEDSUkGwkUo

casainho said:
I am using the ZIP file build with the same firmware flashed with STLink that I can debug. I test on 2 different phones. Please send me the file the zip file that works for you.
I have attached the file.
 
apparently I didn't attach the file. Trying again.
 

Attachments

  • TSDZ2_wireless_remote_ota_update.zip
    92 KB · Views: 6
rananna said:
apparently I didn't attach the file. Trying again.
Thanks for the file. Still does not work.

I did a clean on the master, of some code you had on the previous pull request but was not used. Maybe you can try to run this code and see if the bootloader still works to you, because I am using this same code.
 
rananna said:
The important question is how fast does the TSDZ2 controller get the command to put on the brakes.
So I reversed the problem. I set up GARMIN ANT+ simulator and recorded the connection with a TSDZ2 remote controller.
As you can see from the video, the response is virtually instantaneous, as the page 16 is sent as an interrupt and is processed immediately.
So, I think this is acceptable for implementing a brake, even if there is a .3-.5 second delay before the LED comes on in the remote. video here:
https://www.youtube.com/watch?v=vEDSUkGwkUo
Looking at the video, seems slow but anyway, if is the best we have now. Maybe later we can investigate Bluetooth as it can be fast for joysticks of games of 60 hertz.
 
casainho said:
rananna said:
apparently I didn't attach the file. Trying again.
Thanks for the file. Still does not work.

I did a clean on the master, of some code you had on the previous pull request but was not used. Maybe you can try to run this code and see if the bootloader still works to you, because I am using this same code.
Well, after looking again at your video, the flash did work.

But I need to test again because after flash the firmware seems not be running...

Also the process seems wrong... I was not expecting that happening, the first time flashing hangs and then we need to start again...
 
casainho said:
Looking at the video, seems slow but anyway, if is the best we have now. Maybe later we can investigate Bluetooth as it can be fast for joysticks of games of 60 hertz.
I really don't see much delay between the 'click' and the response!
Perhaps I am misunderstanding your requirements for the brake sensor speed. You imply that gaming speeds might be needed. Why is that? My thought is that having the motor cut out in a few ms is fine. Why do we need it to be faster?
 
casainho said:
Also the process seems wrong... I was not expecting that happening, the first time flashing hangs and then we need to start again...
With mobile devices the nrf connect dfu process is in this order:
1. Select the file
2. Firmware reboots into dfu mode in the bootloader ( led starts to flash)
3 app uploads the file to the bootloader
4 bootloader writes the file to app area of flash
5 bootloader restarts and boots into the new app.

The mobile app is basically waiting while steps 2-5 happen, as Nordic does not display much info in the app. Also, their data transfer graph does nothing! This can give the impression of the app 'hanging'

casainho said:
i need to test again because after flash the firmware seems not be running...
The upgrade file I sent was for the remote, not the controller. Maybe that is the issue?
 
I played around a bit more with nrf connect for Android.
Makes more sense now.
Just switch back manually from the DFU characteristic that it automatically switches to and you can see progress.
See
https://youtu.be/NP08v6CLLq4
 
rananna said:
I played around a bit more with nrf connect for Android.
Makes more sense now.
Just switch back manually from the DFU characteristic that it automatically switches to and you can see progress.
See
https://youtu.be/NP08v6CLLq4
I got it working 2 times in 10 times. It is confused the process. Why not go back to that idea of writing the enter bootloader flag and reset, just like we do for ANT ID?

When I have the bootloader DFU, then everything works and is easy to follow.
 
rananna said:
casainho said:
Looking at the video, seems slow but anyway, if is the best we have now. Maybe later we can investigate Bluetooth as it can be fast for joysticks of games of 60 hertz.
I really don't see much delay between the 'click' and the response!
Perhaps I am misunderstanding your requirements for the brake sensor speed. You imply that gaming speeds might be needed. Why is that? My thought is that having the motor cut out in a few ms is fine. Why do we need it to be faster?
I saw again the video and it seems fast. I think the best way is to advance and test with real motor.

I would say cut in less than 50ms my be ok, but not more than that. On current firmware motor firmware, as soon the digital brake signal arrives, it takes no more than about 100us to react.

Another thing, the firmware for the Wireless board, the Makefile is not merging the bootloader with the firmware? I was expecting the Makefile to merge the bootloader and firmware file, just like on the SW102 Makefile:

release_build: generate_dfu_package
$(NRFUTIL) settings generate --no-backup --family NRF51 --application $(OUTPUT_DIRECTORY)/nrf51822_sw102.hex --application-version $(VERSION_NUM) --bootloader-version 0 --bl-settings-version 1 $(OUTPUT_DIRECTORY)/bootloader_setting.hex
$(SREC_PATH)srec_cat -MULTiple $(BOOTLOADER_HEX) -Intel $(SOFT_DEVICE) -Intel $(OUTPUT_DIRECTORY)/nrf51822_sw102.hex -Intel $(OUTPUT_DIRECTORY)/bootloader_setting.hex -Intel -Output $(RELEASE_DIRECTORY)/sw102-full-$(VERSION_STRING).hex -Intel
 
casainho said:
rananna said:
I played around a bit more with nrf connect for Android.
Makes more sense now.
Just switch back manually from the DFU characteristic that it automatically switches to and you can see progress.
See
https://youtu.be/NP08v6CLLq4
I got it working 2 times in 10 times. It is confused the process. Why not go back to that idea of writing the enter bootloader flag and reset, just like we do for ANT ID?

When I have the bootloader DFU, then everything works and is easy to follow.
Very strange. It works consistently well both for me on several mobile devices as well as my laptop and desktop windows and ubuntu computers. But, since we can't track down the error, I guess it has to go.
Anyway, writing a special Ant Id to boot into the bootloader will work also. I will make the mods and push an update.
 
Keep it going guys, always fascinates me how you programmers can code as you do and get results despite the lack of documentation and the likes from the manufacturers and other coders.

Big thanks from all of us for your endeavours in this really exciting application for the TSDZ2 engine.
 
casainho said:
.

Another thing, the firmware for the Wireless board, the Makefile is not merging the bootloader with the firmware? I was expecting the Makefile to merge the bootloader and firmware file, just like on the SW102 Makefile:

release_build: generate_dfu_package
$(NRFUTIL) settings generate --no-backup --family NRF51 --application $(OUTPUT_DIRECTORY)/nrf51822_sw102.hex --application-version $(VERSION_NUM) --bootloader-version 0 --bl-settings-version 1 $(OUTPUT_DIRECTORY)/bootloader_setting.hex
$(SREC_PATH)srec_cat -MULTiple $(BOOTLOADER_HEX) -Intel $(SOFT_DEVICE) -Intel $(OUTPUT_DIRECTORY)/nrf51822_sw102.hex -Intel $(OUTPUT_DIRECTORY)/bootloader_setting.hex -Intel -Output $(RELEASE_DIRECTORY)/sw102-full-$(VERSION_STRING).hex -Intel
I pushed a changed makefile as well last time. It looks like you didn't merge it. It has the following changes to make the update files. What zip file did you test dfu with if you were not using this makefile?
Default target - first one defined
default: TSDZ2_wireless bl_settings final OTA
final:
mergehex -m $(OUTPUT_DIRECTORY)/TSDZ2_wireless.hex $(OUTPUT_DIRECTORY)/bl_settings.hex $(BOOT_LOADER) -o $(OUTPUT_DIRECTORY)/TSDZ2_wireless_combined.hex

bl_settings:
$(SREC_PATH)nrfutil settings generate --family NRF52840 --application $(OUTPUT_DIRECTORY)/TSDZ2_wireless.hex --application-version-string $(APP_VER_MAJOR).$(APP_VER_MINOR).0 --bootloader-version 1 --bl-settings-version 2 $(OUTPUT_DIRECTORY)/bl_settings.hex

OTA:
$(SREC_PATH)nrfutil pkg generate --hw-version 52 --sd-req 0xB9 --application-version-string $(APP_VER_MAJOR).$(APP_VER_MINOR).0 --application $(OUTPUT_DIRECTORY)/TSDZ2_wireless.hex --key-file private.key --app-boot-validation VALIDATE_ECDSA_P256_SHA256 $(OUTPUT_DIRECTORY)/TSDZ2_wireless_ota_update.zip
 
rananna said:
casainho said:
.

Another thing, the firmware for the Wireless board, the Makefile is not merging the bootloader with the firmware? I was expecting the Makefile to merge the bootloader and firmware file, just like on the SW102 Makefile:

release_build: generate_dfu_package
$(NRFUTIL) settings generate --no-backup --family NRF51 --application $(OUTPUT_DIRECTORY)/nrf51822_sw102.hex --application-version $(VERSION_NUM) --bootloader-version 0 --bl-settings-version 1 $(OUTPUT_DIRECTORY)/bootloader_setting.hex
$(SREC_PATH)srec_cat -MULTiple $(BOOTLOADER_HEX) -Intel $(SOFT_DEVICE) -Intel $(OUTPUT_DIRECTORY)/nrf51822_sw102.hex -Intel $(OUTPUT_DIRECTORY)/bootloader_setting.hex -Intel -Output $(RELEASE_DIRECTORY)/sw102-full-$(VERSION_STRING).hex -Intel
I pushed a changed makefile as well last time. It looks like you didn't merge it. It has the following changes to make the update files. What zip file did you test dfu with if you were not using this makefile?
Default target - first one defined
default: TSDZ2_wireless bl_settings final OTA
final:
mergehex -m $(OUTPUT_DIRECTORY)/TSDZ2_wireless.hex $(OUTPUT_DIRECTORY)/bl_settings.hex $(BOOT_LOADER) -o $(OUTPUT_DIRECTORY)/TSDZ2_wireless_combined.hex

bl_settings:
$(SREC_PATH)nrfutil settings generate --family NRF52840 --application $(OUTPUT_DIRECTORY)/TSDZ2_wireless.hex --application-version-string $(APP_VER_MAJOR).$(APP_VER_MINOR).0 --bootloader-version 1 --bl-settings-version 2 $(OUTPUT_DIRECTORY)/bl_settings.hex

OTA:
$(SREC_PATH)nrfutil pkg generate --hw-version 52 --sd-req 0xB9 --application-version-string $(APP_VER_MAJOR).$(APP_VER_MINOR).0 --application $(OUTPUT_DIRECTORY)/TSDZ2_wireless.hex --key-file private.key --app-boot-validation VALIDATE_ECDSA_P256_SHA256 $(OUTPUT_DIRECTORY)/TSDZ2_wireless_ota_update.zip

OK, I will test.

rananna said:
Very strange. It works consistently well both for me on several mobile devices as well as my laptop and desktop windows and ubuntu computers. But, since we can't track down the error, I guess it has to go.
Anyway, writing a special Ant Id to boot into the bootloader will work also. I will make the mods and push an update.
For me, when it fails I simple do not see the DFU, it is like it fails to reset as I also do not see the RGB LED flashing.

So please add the new characteristic specifically to set the bootloader startup flag and reset the system, like
what is currently done to change the ANT ID.
 
casainho said:
So please add the new characteristic specifically to set the bootloader startup flag and reset the system, like
what is currently done to change the ANT ID.

To keep it simple for the user I propose we eliminate the new characteristic and use the existing ANT ID characteristic to put into DFU mode. For example, entering an ANT ID of 999 will cause the board to reboot into DFU mode.
 
rananna said:
casainho said:
So please add the new characteristic specifically to set the bootloader startup flag and reset the system, like
what is currently done to change the ANT ID.

To keep it simple for the user I propose we eliminate the new characteristic and use the existing ANT ID characteristic to put into DFU mode. For example, entering an ANT ID of 999 will cause the board to reboot into DFU mode.
By the way, you can already force a reboot into dfu from the existing characteristic by changing notifications .on the secure dfu service.
This is too complicated for users though
 
Back
Top